Does your record player remain quiet even at full volume?
The same happened to me in my initial days of entering the vinyl world, and I can’t tell how disappointed I was.
It took me 2 hours to understand everything and complete my first-ever turntable setup, but when I placed my record over the platter and turned on the unit. There was not a single word that my speakers were outputting.
After endless research, I found the culprit. I accidentally transmitted my turntable’s output to the “LINE” terminals of the receiver (silly phono preamp error).
Even now, I have been asked continuously for the solution to this problem, so yes, there are many people who face similar issues and are finding solutions.
To create a one-stop guide for all record player sound-related problems, I did the research (tough part) and found proven methods to fix low sound issues. Here, in this article, I will share my experience, facts, and common mistakes along with solutions that people make when setting up their units.
Let’s fix your turntable together.
Why is my record player so quiet?
I have listed all the possible reasons and the solutions behind this issue, and I recommend trying each one, starting from the first to the last, until you find the real culprit.
Let’s troubleshoot your unit.
Reason 1: Phono preamp issue
Most of the time, the switched-off phono preamp is the culprit.
Understanding of the phono preamp concept and its role is crucial if you want to prevent consistent troubleshooting on your setup.
After the phono preamp comes another important topic, i.e., phono and line signals. You can learn the difference between them here: Phono vs line.
After understanding both concepts, you should know that phono signals are pretty weak in volts and need amplification, and the reverse application of the RIAA equalization curve to reach line-level signals.
If there is no phono preamp in your setup or it is switched off, the phono signals won’t be amplified to line-level.
This will lead to under-amplification of phono signals, and your speakers will output no sound or very low sound.
Solution:
You need to enable the preamp or add an external phono stage in your setup.
PRO TIP: Transmission of signals should be done from PHONO signals to PHONO terminals and LINE signals to LINE terminals.
Let’s discuss this in detail.
There are two types of phono preamps:
- Built-in phono preamp (turntable, amplifier, or powered speakers)
- External phono preamp
There are four ways to add a phono stage to your turntable setup.
1) Using the turntable’s built-in phono stage
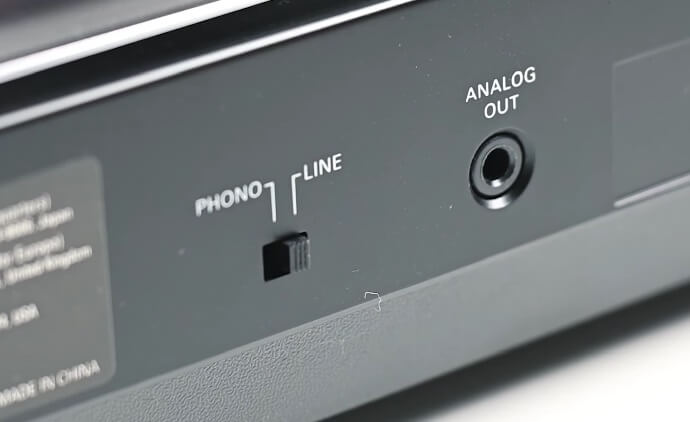
Look for the “PHONO/LINE” switch on the backside or underneath your plinth.
If you find it, your turntable has a built-in phono stage and you need to switch it to “LINE”. However, if you didn’t find the switch, follow other methods.
2) Using a powered amplifier or a stereo receiver’s built-in phono stage
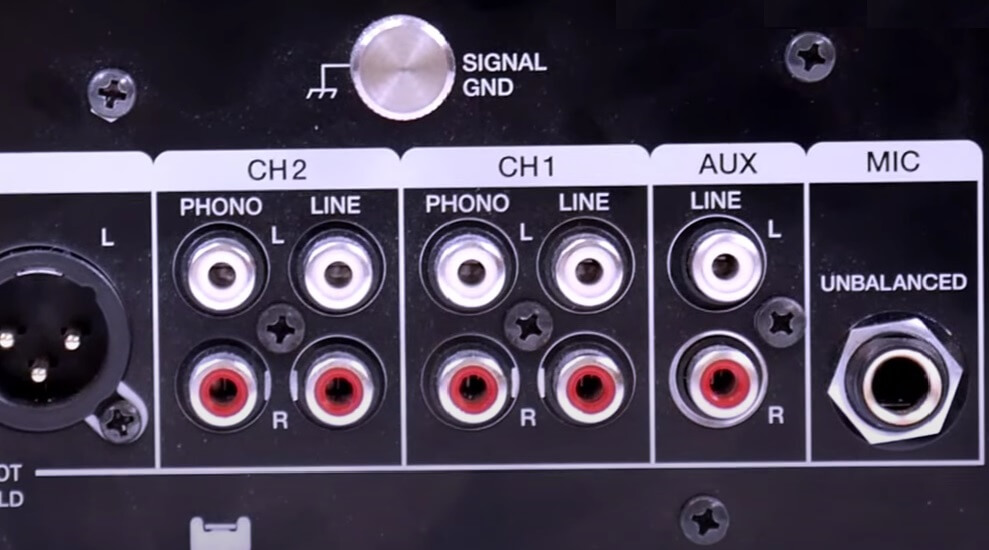
In the above image, you can see “PHONO” inside the CH1 and CH2 columns, which indicates that your receiver has a built-in phono stage.
Note: If you don’t have “PHONO” terminals behind your amp/receivers, then your device doesn’t have a built-in phono stage.
To use the receiver’s phono stage, you need to transmit the output from the turntable into the “PHONO” terminals.
After that, take the output from the “LINE” terminals and transmit to the speakers. (The signal transmission is done using RCA cables.)
3) Using a powered speaker’s built-in phono stage
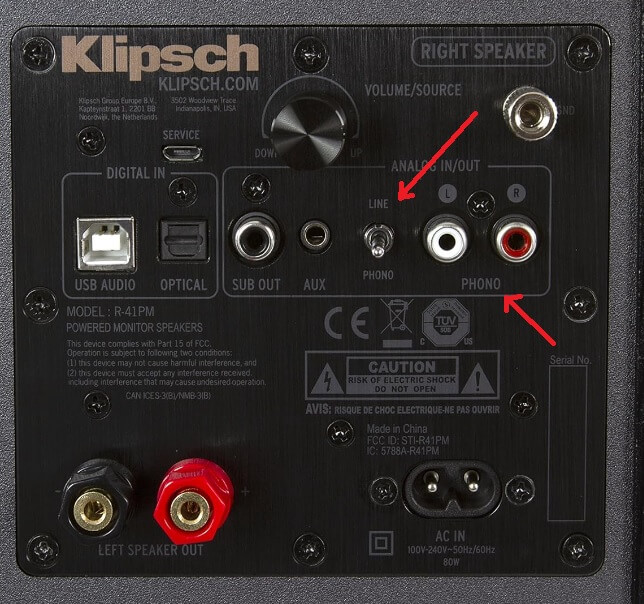
This is the rear view image of my Klipsch active/powered speakers.
Note: If you don’t have a “PHONO/LINE” switch behind your speakers, then your speaker doesn’t have a built-in phono stage.
You need to switch the “PHONO/LINE” to “LINE”. Once done, transmit the output from the turntable into the “PHONO” terminals of your speakers.
4) Using an external phono stage device
If none of your devices have a built-in phono stage, then you need to use an external phono stage.
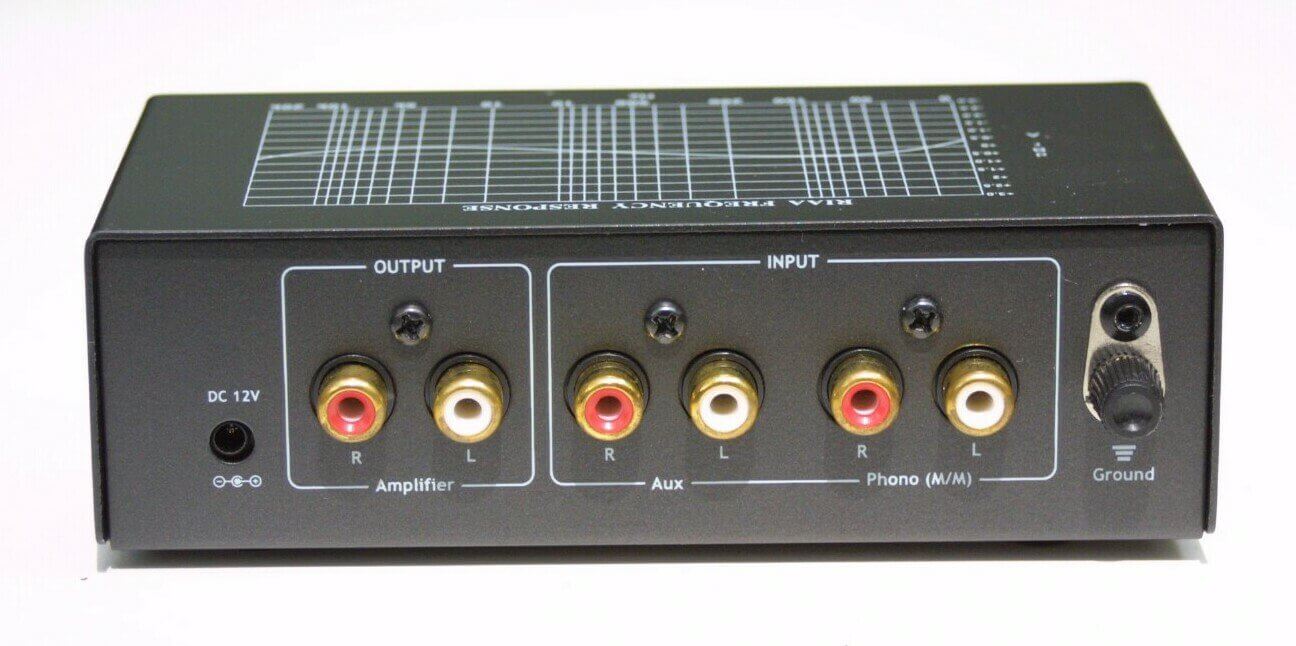
Just like the amplifier/speakers method, you need to transmit the output from the turntable into the “PHONO” terminals.
After that, take the output from the “LINE” terminals and transmit to the speakers. (The signal transmission is done using RCA cables.)
That’s it.
From all these mentioned ways, you need to use one method to add a phono stage to your setup.
To learn more about these different setups, along with an in-depth grounding guide, I recommend checking out this article: How to ground a record player.
Reason 2: Phono/BT/Line switch on Crosley or Victrola (suitcase record player)
This is the most common reason why your Crosley or Victrola record player remains quiet.
Most suitcase record players available on the market offer a Bluetooth feature that lets you connect your smartphone or other devices to the record player’s built-in speakers and enjoy music.
And, to switch between Bluetooth mode and vinyl mode, we have a single switch.
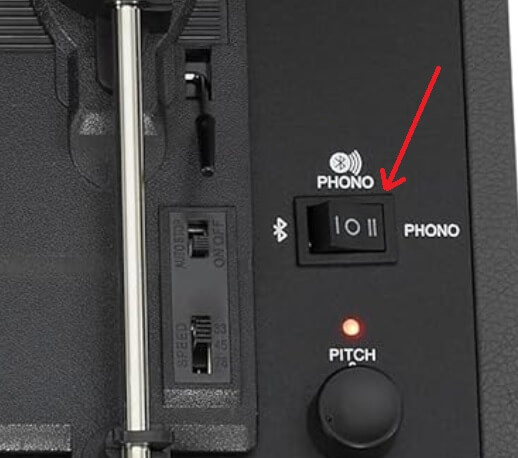
So, if you switch it to “BT” and try to play the vinyl, then you won’t hear any sound coming from your record player speakers.
Solution:
Here are three different solutions depending on your setup:
i) Playing records with the unit’s built-in speakers:
Switch the “PHONO/BT/LINE” switch to PHONO.
ii) Playing records with the external speakers through the AUX:
Switch the “PHONO/BT/LINE” switch to LINE.
iii) Playing external music on the unit’s built-in speakers:
Switch the “PHONO/BT/LINE” switch to BT.
That’s it.
Reason 3: Using an MM (Moving Magnet) compatible phono preamp with an MC (Moving Coil) cartridge
Moving magnet and moving coil are the two popular and commonly used phono cartridges.
There is a difference in engineering between the two, which makes the MC cartridge signals comparatively weak. To understand why signals are weak, I recommend reading this article: MM vs MC cartridges.
Weak signals mean that the signals output by the moving coil cartridge require comparatively more amplification to reach line-level signals.
As a result, devices such as a head amp, step-up transformer, or a phono preamp compatible with moving coil cartridges are introduced in a turntable setup.
When using a moving coil cartridge, if these devices are not added to our setup line-up, then the phono signals will remain underamplified, which causes the record player to slow.
Similarly, using these devices in your setup line-up when using a moving magnet cartridge, the situation of over-amplification of signals will arise, which will cause the record player to sound distorted.
Solution:
While using an MC cartridge, you need a phono preamp that is compatible with MC cartridges, or use a head amp or step-up transformer.
For better understanding, have a look at this image:
 Here, you will see there are two inputs, i.e., MM (Moving Magnet) and MC (Moving Coil).
The MM input is for the turntable with moving magnet (MM) cartridges, while the MC input is for the turntable with moving coil (MC) cartridges.
Reason 4: Wrong channel selection on the stereo receiver or powered amplifier
I have seen many users who have connected their turntable perfectly, but by mistake, they have selected the wrong channel in their amplifier.
I know this is a little confusing, so let me explain things better through the image below:

In the above image, you will see two channels, i.e., CH1 and CH2.
If you have connected your turntable’s output to CH1, then you should select the CH1 channel in your amplifier, and the same goes for CH2.
If you have selected the CH2 channel while the turntable’s output is connected to the CH1 channel, then you will hear no sound from your speakers.
Solution:
You can either switch the RCA cables to the terminals of the selected channel in your receiver, or you can change the channel in your receiver settings.
That’s it.
Reason 5: Loose Connections
The loose connection can also cause your record player to output very low sound. There could be loose RCA cable connections, loose cartridge connection pins, or the stylus may not be attached properly.
Solution:
I recommend performing the following actions on your turntable setup:
i) Re-connect the RCA cables
I recommend rewiring your turntable’s RCA cables and ensuring the wires are not loose.
ii) Cartridge connection pins
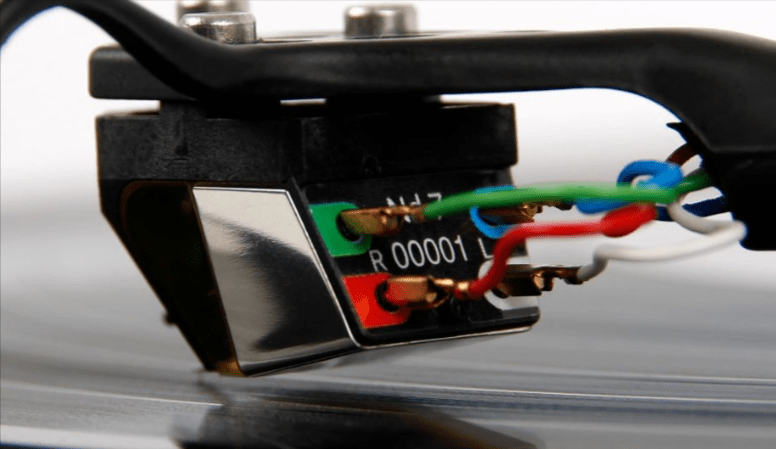
Although this is quite rare, the cartridge connection pins could be loose at your end. You need to tighten them again.
iii) Stylus Placement
Note: It works only when the cartridge has a user-replaceable stylus.
The stylus placement issue arises with a cartridge that has a user-replaceable stylus. Remove the stylus and reattach it to the cartridge again properly.
Reason 6: Issues with the stylus & tracking force
There are four types of stylus issues you can face:
i) Stylus guard:
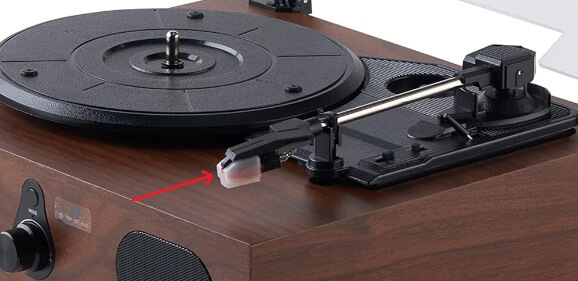
I never thought until I saw people talking about this issue in forums. That’s the reason I have also added this problem here.
The turntable comes with a stylus guard, which is attached to the stylus, protecting it while in transit.
Once people receive their order, in excitement, they forget to remove the guard and directly place the tonearm over records to play, but in the end, the speakers stay silent.
Solution:
Remove the stylus guard before playing the record and re-attach it once you are done playing to protect your stylus.
ii) Loose stylus or incorrect placement:
We have mentioned this in the “loose connections” section. If your cartridge allows a user-replaceable stylus, then you might have a loose connection.
Solution:
Remove the stylus and try reattaching it.
iii) Stylus worn out:
Everything in this world has a lifespan, and so does the stylus. The average lifespan of a stylus is 1000-1200 playing hours. However, a diamond stylus can last a little longer and have 1800-2000 playing hours.
Solution:
You need to check the current condition of your stylus following the method mentioned below.
How to check if a Stylus has worn out:
You need a magnifying glass and a bright light.
Place the needle on a white surface and try to see it using a magnifying glass. Check for bends or cracks on the needle. You can also take the help of a microscope.
After examination, if you find the stylus has worn out, replace it immediately.
iv) Tracking force
A low tracking force can restrict the stylus from maintaining its position inside the record grooves. As a result, the audio signals are not fetched properly, and you may face either a record skip or low sound issues.
Solution:
You should re-adjust the tracking force according to your cartridge’s recommended tracking force settings.
For a detailed step-by-step, you can follow this article about tracking force and anti-skate adjustment.
Reason 7: Power adapter issues
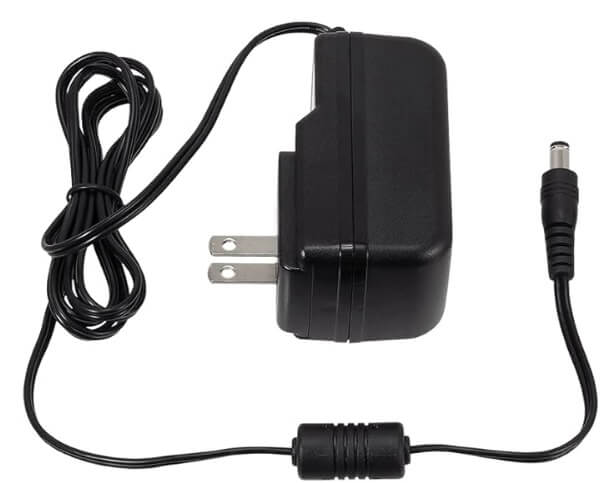
The power adapter can secretly affect your sound quality without you even noticing it.
In many cases, I have seen an adapter supply less power to the circuits than required, which results in the turntable sounding low.
This problem mostly occurs when you are using the power adapter of another unit.
All turntables have different features, and similarly, their power requirements.
Some record players require a 9V power adapter to function properly, while others require a 12V adapter.
If you are using a 9V adapter on your turntable, which requires a 12V adapter to function properly, then you will encounter many problems in your vinyl journey.
Solution:
Always use the power adapter that is compatible with your turntable or record player model.
You can check the power adapter compatibility with the customer support of the unit’s brand.
Let me share my experience on this.
I have seen a person using the Crosley Keepsake record player with the power adapter of the Crosley Cruiser. Here, the Crosley Keepsake requires a 12V adapter while the Crosley Cruiser requires a 9V adapter. So, unknowingly, he was supplying 9V power to a record player, which requires 12V of power to function properly.
This situation can give rise to multiple problems, such as low sound, distorted sound, the Victrola record player not turning on, the Crosley record player not spinning or Crosley record player not turning on, and much more.
To prevent trouble in the future, always use a power adapter compatible with your turntable or record player model.
Reason 8: Record issues
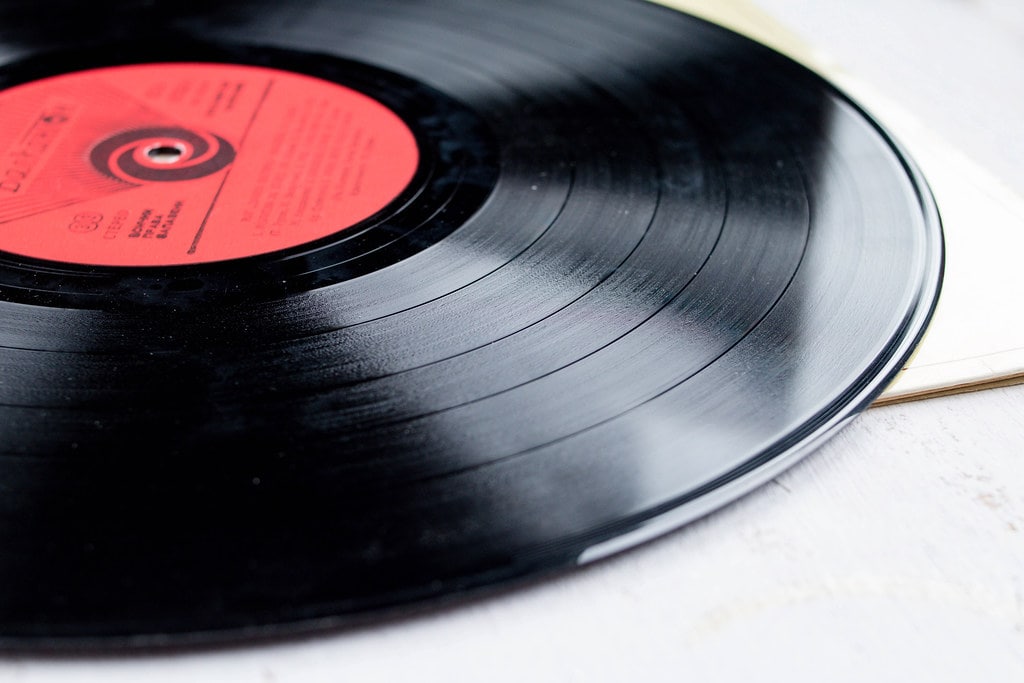
Many people may not agree with me that records can also cause low sound problems.
Well, it is not related to overused records or anything like that.
Here, I am talking about badly recorded sound. If the original sound is badly equalized before vinyl pressing, then you will face sound issues with it.
Solution:
The best way is to try playing the record on a different setup or playing a different record on the same setup.
If your vinyl record is sounding bad or still output slow sound, I recommend buying a new copy.
Reason 9: Dirty, oxidized, or corroded terminals/lug or wire connectors
The dirty, oxidized, or corroded terminals, lugs, or connectors can restrict the flow of electric signals, which could result in low sound problems, or your record player can stay quiet.
Solution:
You should clean the terminals and connectors and ensure that there are no dust particles. In the case of oxidized cables, I recommend buying a new pair of RCA cables.
Reason 10: Blown speakers
Solution:
Test the speakers with different media such as CD players, Bluetooth, AUX, etc. If the speakers remain silent or outputs slow sound, get them repaired or buy a new pair of speakers.
Reason 11: Faulty amplifier
Solution:
Test the amplifier with different setups or get it checked by a professional. If found faulty, get it repaired or replace it with a new unit.
Reason 12: Faulty internal/external phono stage
Solution:
If you have tried every solution mentioned in the article, then you must get your phono stage checked by a professional. It happened to me a long time ago when the phono stage of my receiver stopped working. I got it fixed by a professional.
I hope you have fixed the record player, and it’s working fine now. If you have a query, feel free to comment below. We will get back to you as soon as possible.


Ahhaa, finally I fixed my turntable’s outputting no sound from speakers.
After fixing it, I felt quite embarrassed that after all endless research to fix the no sound problem, at the last, wrong channel selected in the amplifier is the culprit.
Thanks James for helping me out.
I am glad to help you out. 🙂