 James Williamson
 Disclosure: This article contains affiliate links and as an Amazon Associate, we earn from qualifying purchases made through our links.
Are you getting a hum and buzz sound from your speakers?
It is a common problem, or I can say the most irritating one, which can ruin anyone’s vinyl listening experience in no time. And the main reason behind this is grounding.
Well, grounding a turntable plays a crucial role in achieving perfect sound quality from your setup and eliminating unwanted noises.
And, you know what? Grounding your setup is a lot easier than it sounds!
Here, in this article, we are going to talk about turntable grounding, why it is important, types of hum and buzz sounds, and how to ground a record player. We have also discussed possible grounding problems that you might face with your setup.
So let’s get started.

AT-LP60X-BK with Edifier R1280DB speakers
A beginner-friendly combo to kickstart your vinyl journey — no extra phono preamp or amplifier needed!
- Beginner-friendly
- Complete plug-and-play setup
- Fully automatic turntable
- High-fidelity sound
- Sleek design and easy to use
What is Turntable Grounding and Why is it important?
Ground is a common return path for an electrical current, which helps minimize the risk of electric shock through damaged circuits, voltage spikes, and short circuits.
In turntable setups, multiple devices (turntable, external phono preamp, amplifier, and speakers) are connected, and we need to make sure that all the connected devices have a common return path or a common ground.
Making a common ground in a turntable setup is known as turntable grounding.
If all the connected devices have multiple paths to ground, a ground loop or earth loop will occur.
And the ground loop causes interference in audio and results in noise, hum, and buzz that you might hear from your speakers.
In most cases, the ground loop is the main culprit, but sometimes the humming occurs due to feedback.
Let me share a brief difference between ground loop and feedback, along with a sample of noise caused by each.
What is a Ground loop?
Ground loop occurs when the devices in your turntable setup have multiple paths to ground.
Example of noise caused by a ground loop:
How to fix a ground loop:
You need to use a grounding wire and add grounding to your setup.
What is Feedback?
Feedback occurs when vibrations from any source reach the stylus, which are further amplified by the phono stage and amplifier. It can also occur due to over-amplification of phono signals.
Example of noise caused by feedback:
How to fix feedback:
You need to make your turntable isolate from vibrations. That’s it.
So, this is all about turntable grounding, why it’s important, and types of buzz, hum and noises.
Now, let’s discuss a step-by-step guide to ground your record player setup.
How to Ground a Turntable:
The turntable grounding method depends on your turntable setup.
During my research, I noticed that everyone has shared the grounding process with only one setup type: Turntable > external phono stage > amplifier > speakers.
As we all know, there are multiple ways to set up a turntable, and people using a different setup from the one mentioned above can get confused.
I know this because I’ve been in the same situation as a beginner. Well, I was using a turntable with a built-in phono stage, and I found nothing on the internet about grounding turntables having built-in phono stages.
So, to save beginners from the trouble I faced, I have shared the grounding process according to different turntable setups. You need to look out for your turntable setup mentioned in the headings below and you will find the grounding process.
Types of turntable setups
- Turntable using an external phono preamp
- Turntable using a receiver/amplifier’s built-in phono stage
- Turntable using an active speaker’s built-in phono stage
- Turntable having a built-in phono stage / internal phono preamp
The sound quality of your setup depends on your knowledge of phone and line signals. So, before proceeding further, I recommend that you learn about phono and line-level signals from here.
So, these are the possible turntable setups, and now, I am sharing the ground process for each setup one by one.
Note: We are using an Audio-Technica AT-LP120XUSB turntable as an example here, which has also secured its place in our list of best turntables under $500.
Setup 1- Turntable using an external phono preamp
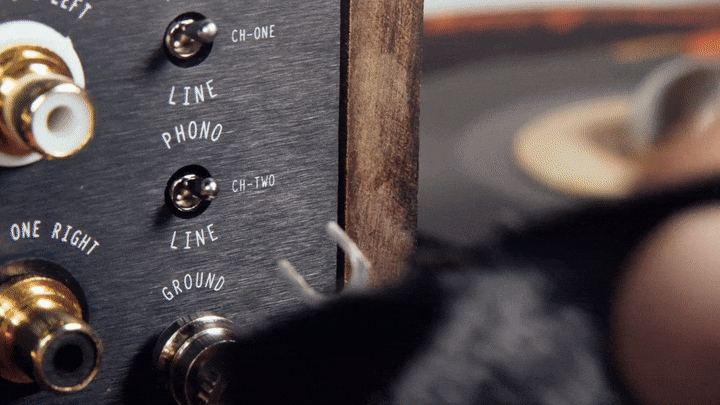
Note: If your turntable has a built-in preamp, you need to disengage it by switching the phono/line switch to the phono.
In this setup, your turntable outputs phono signals, and the phono to line level amplification, along with reverse application of the RIAA equalization curve, is done by an external phono preamp.
In the further line of devices, you can either have a receiver or amplifier > passive speakers, or you can have active speakers right after an external phono stage.
How to ground a turntable with an external phono preamp:
1) Turn off the turntable and unplug it from the power source.
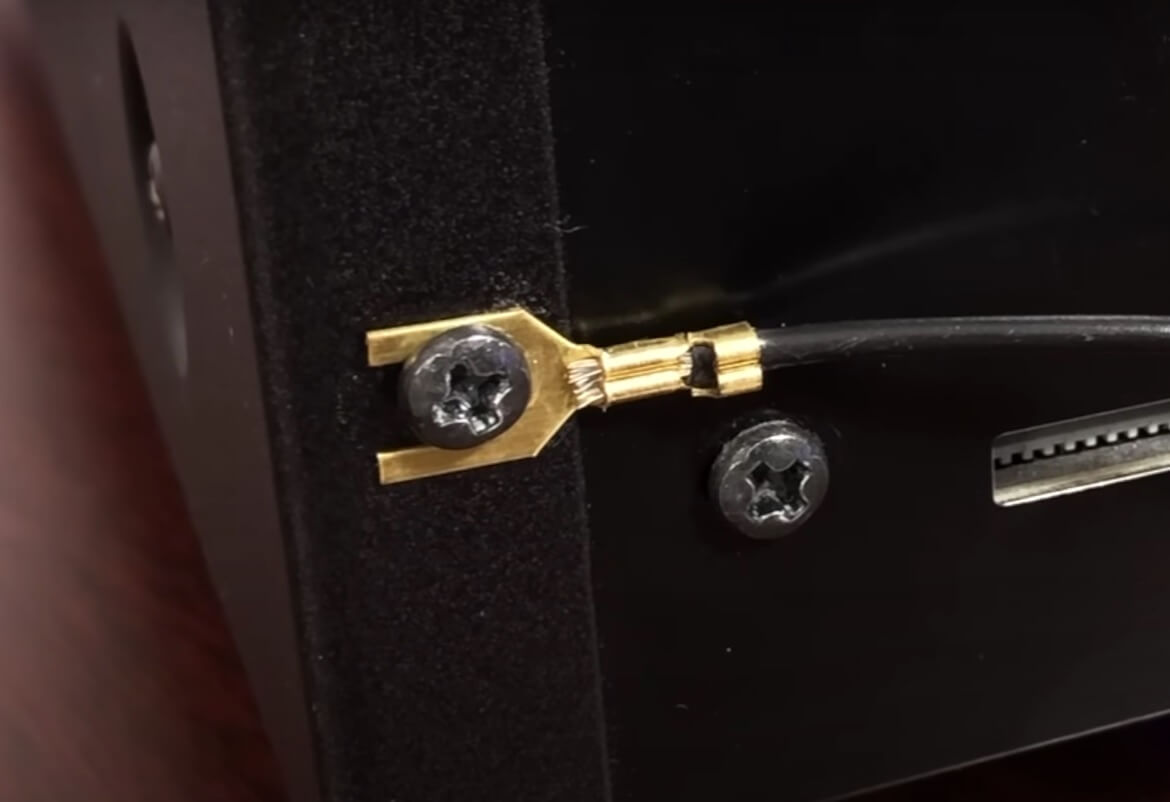
2) You should have received an RCA cable with a ground wire along with your turntable. In some turntables, you will find a separate ground wire underneath the chassis of the turntable, which is already connected to the chassis.
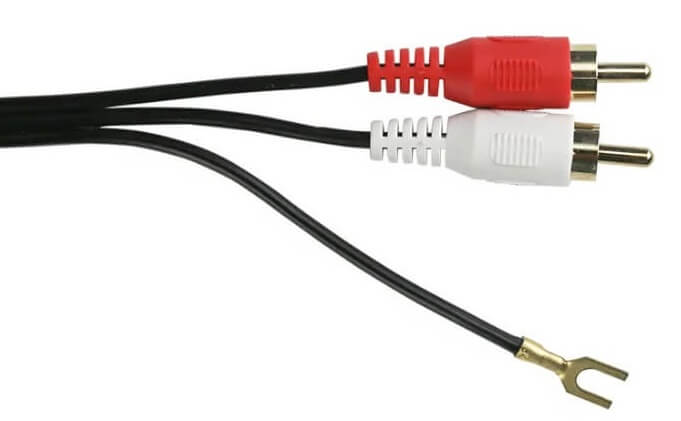
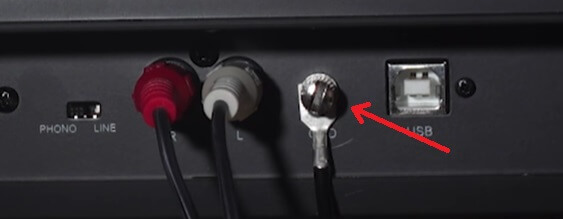
Now, locate the ground lug on the back of your turntable. You will see either “GND“, “Ground” or ![]() on top of the lug. The ground lug labelling depends on the turntable model.
on top of the lug. The ground lug labelling depends on the turntable model.
For example: in my turntable, the ground lug is labeled as GND.
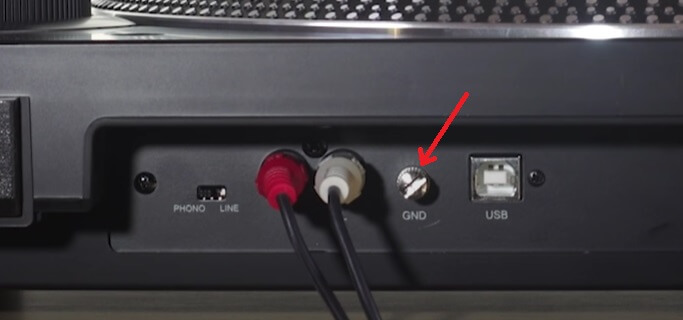
3) Loosen up the screw and insert the grounding wire fork spade wire connector in-between the space of the screw and terminal and tighten it up. This is how you can connect the ground wire to the turntable.
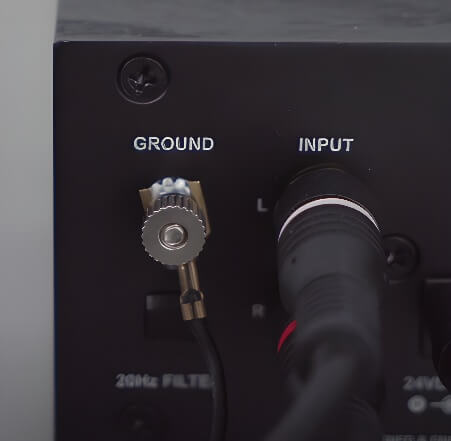
4) The next step is to connect the other end of the ground wire to the phono stage’s ground lug. So, look out for the ground lug on your phono stage’s backside. Follow the same process again, i.e., loosen up the screw, place the grounding wire fork spade wire connector in-between the space of the screw and terminal and tighten it up.
That’s it. You have successfully grounded your turntable with a phono stage.
Setup 2- Turntable using a receiver/amplifier’s built-in phono stage
Note: If your turntable has a built-in preamp, you need to disengage it by switching the phono/line switch to the phono.
In this setup, your turntable outputs phono signals, and the phono to line level amplification, along with reverse application of the RIAA equalization curve, is done by stereo receivers or amplifiers’ built-in phono stage. Once, stereo receiver is done with amplification of phono to line level signals, it also amplifies the line level signals to a level hearable to human ears.
In the further line of devices, you can have either active speakers or passive speakers with signals from the amplifier transmitted at line level input.
Here, you need to ground the turntable to the receiver or power amp/amplifier.
How to ground a record player with a receiver/power amplifier having a built-in phono preamp:
1) Turn off the turntable and unplug it from the power source.
2) Connect the ground wire to the back of the turntable. (Detailed steps are mentioned here)
3) Once done, check the backside of your receiver or amp. Well, there can be two cases here, your powered amp might have a ground lug or might not.
Case 1: Ground Lug Exists
If you found a ground lug at the backside of your receiver or amp then you need to loosen up the post screw, place the grounding wire fork spade wire connector in-between the space of the post screw and terminal and tighten it up.
That’s it.
Case 2: Ground Lug Doesn’t Exist
In this case, you need to connect the other end of the ground wire to the amplifier’s body.
Well, there are two methods:
Method 1: Using amplifier’s body screws (Recommended)
Here, you need to loose up any screen of your amplfier’s body, place the grounding wire fork spade wire connector in-between the space of the post screw and terminal and tighten it up.
Method 2: Using gaffer tape
If you don’t want to use the above method, then you can tape the other end of the ground wire to the amplifier’s metal body using gaffer tape. Make sure the wire is not loose.
From both of these solutions, I recommend you apply the first one, i.e., using amplifiers body screw because it will last longer.
That’s it. You have successfully grounded your turntable with the receiver.
Setup 3- Turntable using an active speaker’s built-in phono stage
Note: If your turntable has a built-in preamp, you need to disengage it by switching the phono/line switch to the phono.
In this setup, your turntable outputs phono signals, and everything other step is done by the active speaker itself.
Active speakers first amplify the phono to line level amplification, along with the reverse application of the RIAA equalization curve. After that, it amplifies the line level signals to a level hearable to human ears and outputs the sound.
In this setup, there are two scenarios:
- Hum or buzz is hearable
- Hum or buzz is not hearable
If Hum or buzz is not hearable, you can just ignore the grounding process.
On the other hand, if noise is hearable, you need to ground the turntable to the active speakers.
How to ground a record player with active speakers having a built-in phono preamp:
1) Turn off the turntable and unplug it from the power source.
2) Connect the ground wire to the back of the turntable. (Detailed steps are mentioned here)
3) Once done, check the backside of your active speakers. Well, there can be two cases here, your speakers might have a ground lug or might not.
Case 1: Ground Lug Exists
If you found a ground lug at the backside of your active speakers then you need to loosen up the post screw, place the grounding wire fork spade wire connector in-between the space of the post screw and terminal and tighten it up.
That’s it.
Case 2: Ground Lug Doesn’t Exist
In this case, you need to connect the other end of the ground wire to the speakers’ body. You can either inscrew speaker’s body screw and connect your ground wire or you can use gaffer tape to paste the ground wire to speaker’s body. (Detailed steps are mentioned here)
That’s it. You have successfully grounded your turntable with the active speakers having a built-in phono stage.
Setup 4- Turntable having a built-in phono stage / internal phono preamp
Note: You must engage your built-in phono preamp by switching the Phone/Line switch to Line.
In this setup, your turntable outputs the signals at the line level, which means that the phono to line level amplification and reverse application of the RIAA equalization curve is already done, and the signals are at 0.316V.
In the further line of devices, you can have either a receiver/powered amplifier with passive speakers or just active speakers.
In this setup, you don’t need to do the grounding process yourself. The manufactures already did the internal grounding for you. But if you are still hearing a humming sound, then you can simply ground your turntable with the receiver or active speakers.
That’s it.
Well, I have explained turntable grounding in all the possible turntable setups but still, some cases require their explanation. So now, I am going to explain some unexpected issues that you might face while grounding the turntable.
Turntable Ground Issues:
Now, we are going to list some common issues that you may face while grounding your turntable and their solution.
Issue 1- Turntable has no ground wire but has a ground lug on the backside:
Solution:
You either need to buy a ground wire or create one yourself, following the steps below:
How to Create Turntable Grounding Wire At Home (DIY):
Here are the things required to make a grounding wire.
- 18-22 gauge stranded wire (small wire)
- Fork spade wire connector
Steps:
1) Measure the distance between your turntable and the device you are trying to ground it with. Also, make sure that the distance between the devices is not more than 5 feet.
2) Use a wire stripper or needle-nose pliers and remove around 10mm isolation from both ends of the wire.
3) Take the fork spade wire connector and connect it at both ends.
That’s it. You have successfully created a turntable grounding wire yourself.
Issue 2- Turntable has no ground lug or terminal
Solution:
The turntables without a ground lug don’t need external grounding at all. The manufacturer has already handled the grounding internally. You will mostly find internal grounding in DJ turntables.
But if you still have ground issues with it, then you can follow the method below:
How to fix a Hum on a turntable that has no ground lug:
Note: My friend has shared this solution with me, and he has fixed the humming sound on his Rega Planar 1 turntable by following this method.
1) Take a grounding wire or an 18-22 gauge stranded wire and connect it to the ground lug on your phono preamp.
2) Now, take the other end of the ground wire and connect it to the ground lug of the receiver or the chassis of the receiver.
That’s it.
Issue 3- Grounding is done perfectly, but still humming sound is coming
Here are the reasons why a ground loop can occur even after grounding is done perfectly.
Reason 1- Dirty, oxidized, or corroded terminals/lug or wire connectors
Solution:
Check whether the wires, wire connectors, terminals, or lugs are clean. If not, then clean them right away to replace them.
Reason 2- Twisted or tangled ground wire
Solution:
The twisted or tangled ground wire can reduce the effectiveness of grounding. So, arrange the wires in the straightest and cleanest way possible.
Reason 3- Grounding wire length
Solution:
The recommended wire length is around 5 feet. If it is longer than 5 feet then try placing the equipment closer to each other and cut off the extra wire.
Reason 4- Restrict wire touching other metal objects or wires
Solution:
If your ground wire is touching other metal objects or is tangled with other wires then I recommend that you rearrange the wire and make sure it is not touching anything.
Reason 5- Plug your turntable directly into an AC power outlet
Solution:
Remove any power bars or surge protectors and plug your turntable power cord directly into the AC power outlet.
So, these are some turntable grounding issues that you might face even after perfectly grounding your turntable.
Well, there is one more method to ground your turntable, i.e., internal grounding. So, let’s discuss it.
How to ground a record player internally (Internal grounding):
This method is used by many turntable manufacturers which removes the whole external grounding process. I am attaching a video tutorial for this.
Note: I am attaching this method for knowledge purposes only. I won’t recommend anyone to follow this method because, first of all, your brand’s warranty will be voided, and secondly, you might damage your turntable to a non-repairable condition. So, if you want to try this, then try it at your own risk.
Frequently Asked Questions:
Q1- Does a turntable need to be grounded?
Yes, grounding a turntable is a very important process and shouldn’t be ignored in any circumstances.
Q2- What happens if I don’t ground my turntable?
You might face ground loop issues, which result in a continuous humming while listening to vinyl records. On top of that, the chances of getting an electric shock from your turntable setup increase.
Q3- When should you ground a turntable?
Well, the grounding process should be part of the turntable setup process.
For example: when you are setting up your turntable like connecting the turntable to a phono preamp, amplifier, or speakers, you should also follow the grounding process side by side.
Q4- Can you connect 2 ground wires together?
No, it is always recommended to have only 1 ground wire connected to a single ground lug; otherwise, a ground loop problem will occur.
Q5- What happens if two ground wires touch?
Most of the time, there won’t be any issues, but I have seen people’s efforts of grounding nullified when their ground wire touches or gets tangled with other wires or touches any metal part. So, I recommend you use cable management tools and prevent your wires from getting tangled.
Q6- Do I need to ground my turntable to my receiver?
You need grounding only when you aren’t using turntable’s built-in phono preamp (LINE mode). If you’re using “PHONO” mode, you need to ground your turntable.
Q7- What does GND mean on a turntable?
It means ground lug or terminal. You need to connect the one end of grounding wire to this lug and other end to terminal of external phono preamp or amplifier.
Q8- Do turntables have to be grounded?
If you’re turntable doesn’t have “GND/ground lug”, you don’t need to worry about it but if it doesn’t, you need to ground it.
I have shared everything you need to know to ground your turntable. If you are still facing issues or have any questions, feel free to comment below. We will get back to you as soon as possible.


How can I determine if my amp has a built in phono preamp
Check for “phono” input on your amp’s body. If you find phono input, it means your amp has built-in phono preamp otherwise not.
So I’ve got a sony ps-lx310bt turntable, sony amp, sony book shelf speakers. 5-6 yr old set up. Everything seems to be built in, but at loud volume I get that hum. Driving me nuts. CDs, Bluetooth I can blast it but phono, no bueno. Any ideas, I spent all day messing with it but I need some direction here. Thanks in advance, bill
Hi Bill,
Please share more information about the setup and connections.