James Williamson
 Well, I know the terms like “tracking force” and “anti-skate” in the turntable setup look scary to many people. Even, I was afraid too when I entered the vinyl world.
When I was setting up my first turntable, I didn’t know about these terms. I was playing with my turntable, and the sound coming out of my speakers was quite bad. So, I called my friend and asked him for his help. He came to my home and directly asked me what the tracking force of the cartridge was. I was like, what the hell does that mean? He laughed a bit and then explained the concept to me.
He helped me in tracking force, anti-skate, wirings, and grounding or I can also say he helped me in completing my turntable setup to perfection. Well, that day I realized, there are so many things to keep in mind while setting up a turntable, and tracking force/anti-skating adjustment is just a part of the process.
And, this is one of the reasons why I started the turntable setup series.
Till now, I have explained different parts of turntable, cartridge alignment techniques, and how to balance tonearm. Now, coming to the 4th step, i.e., adjustment of tracking force and anti-skate.
In this article, I have explained the concept of tracking force and anti-skate and also shared why it’s important. After that, I have shared a step-by-step guide to adjust the tracking force and set anti-skate on the turntable.
So, let’s start and learn the concept of tracking force.
What is Tracking Force & Why It’s Important:
Well, the tracking force is the force/weight that your stylus puts on vinyl records while running inside record grooves.
The perfect tracking force adjustment is required to help your stylus fetch audio signals from the record grooves properly; the audio signals will be in-complete and your setup won’t be able to reproduce the music from grooves perfectly.
By perfect adjustment, I meant, the tracking force should be the recommended force of the cartridge. It shouldn’t be high or lower than the recommendation.
In case, the tracking force is too light then it becomes difficult for your stylus to stay inside the grooves causing the stylus to not fetch audio signals properly. A light force can also cause the stylus to jump on your record which eventually damages the stylus tip and causes record skipping issues.
On the other hand, heavy tracking force forces the stylus to run deeper inside record grooves and the force won’t let your stylus move freely thus the audio signals are not fetched properly and the final output takes a dig. On top of that, heavy tracking force can cause damage to your stylus and record grooves.
So, a perfect adjustment of tracking force is required to make your setup sound good and also avoid damage to the stylus and records.
Now, the question is what is the perfect or recommended tracking force?
What is the Recommended Tracking Force:
Well, every phono cartridge requires a different tracking force suitable for reading the audio signals from the grooves. So, the recommended tracking force depends on the cartridge you are using.
To find the recommended force, you can check the manual or simply google your cartridge model and check the specifications.
That’s it. I hope you understand the concept. Now, let’s learn how you can check the tracking force of your cartridge.
How To Check Tracking Force:
1) Unplug the turntable or record player from the power source & remove the record from the turntable’s platter if it is there.
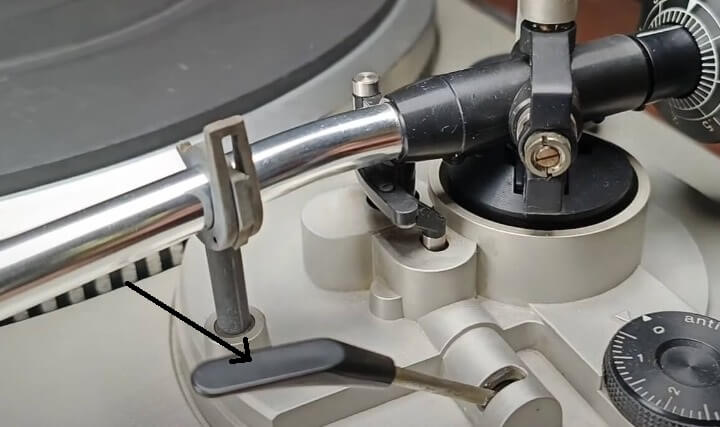
2) Set the cueing device or tonearm lift liver in an upward position.
4) Gently, move the tonearm over the platter, put the stylus force gauge or digital gram scale on the exact place where the stylus sits on the record, and set the cueing device in a downward position.
![]()
5) You will see the force on the gauge or scale.
Well, the scale will display the force your cartridge is putting on the record.
In most of the record players and turntables,the tracking force comes pre-adjusted by manufacturers. So, you don’t need to do anything but if you own a manual unit or your unit has a counterweight dialer then you need to adjust it manually.
Now, we will discuss the tools and steps required to configure the force manually.
Things Required to Adjust Tracking Force:
Cartridge’s recommended weight information
You can check your cartridge’s specification on the manufacturer’s site or the manual that comes with your turntable.
For example:
If your turntable has Orthofon 2M blue cartridge then you can follow these steps:
1) Go to Orthofon 2M blue product page
2) Click on specifications and check for the term- “Tracking force, recommended”
![]()
That’s it. Here, 1.8g (18 mN) is the recommended force of 2M blue.
Stylus force gauge or digital gram scale
![]()
You can buy a Neoteck scale gauge.
Once you get these, you’re ready to proceed to the adjustment part.
How to Adjust The Tracking Force Of Stylus/Cartridge:
Important: Before proceeding further, I want you to set the counterweight dialer to 0. You can learn about this on the 8th step of the tonearm balancing article. After making the recommended adjustments, simply proceed with the process.
For Turntable With Counterweight:
You can adjust the style weight in two ways:
Using Dialer:
In the image above, the black part is the dialer and the silver part is the counterweight. Once you set up the counterweight according to my recommendation, you just need to turn the counterweight towards the pivot point of the tonearm until the dialer reaches the mark of recommended tracking force.
Using Gauge or Scale:
![]()
Adjust the counterweight clockwise or counterclockwise until you see the recommended tracking force of your cartridge on this tracking force gauge or scale.
For Turntable Without Counterweight:
In most cases, if there is no counterweight then the turntable has a fixed cartridge and the tracking force is pre-configured by the manufacturer.
But in rare cases, if there is no counterweight and the cartridge is replaceable then the replacement is allowed with the same cartridge. Even, if you try to fit another cartridge then it won’t fit properly.
Well, I have seen people placing pennies on the cartridge’s top while using bass-heavy records which is not a good practice and can cause damage to the stylus tip.
So, this is all about the tracking weight adjustment. Now, we will proceed to the next step of turntable setup, i.e., anti-skate settings.
First, we will discuss the concept of anti-skate so let’s start.
What is Anti Skate On Turntable:
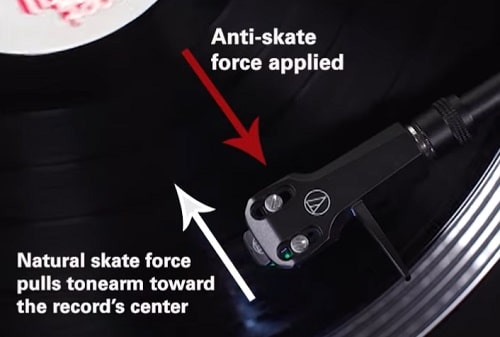
As the name suggests, the anti-skate on the turntable prevents the tonearm from skating over the record surface.
Confusing?
Let me explain the concept in simple words.
Anti-skate is applied to eliminate the skate force applied on the stylus which causes it to move near the center. If you want to learn more about the reason why stylus movies inwards, i.e., opposite of Centrifugal force, you can read about it here.
So, you are playing the records and anti-skate is not applied then the skating force continuously keeps pushing the stylus to move near the spindle, and because, the stylus is running inside the record groove, this continuous inwards pressure will force the stylus towards the spindle results in stylus being in continuous touch with record’s left channel.
This continuous contact with the left channel will restrict the stylus from fetching audio signals from the right channel properly thus affecting the sound quality. On top of that, it also causes the stylus and records to wear out faster.
Till now, I have shared the results if the anti-stake feature is not enabled, and now comes the time to understand the working concept of the anti-skate feature.
How does Anti-Skate Feature Work?
The anti-skating puts outward pressure on the tonearm and maintains a proper balance between inward and outward force which helps in keeping the stylus in the center of the grooves so that the stylus can fetch audio signals from both channels and your turntable can output perfect sound quality.
Well, this is all about the anti-skate feature and how it works. Now, let’s learn how to calibrate the anti-skating on the turntable.
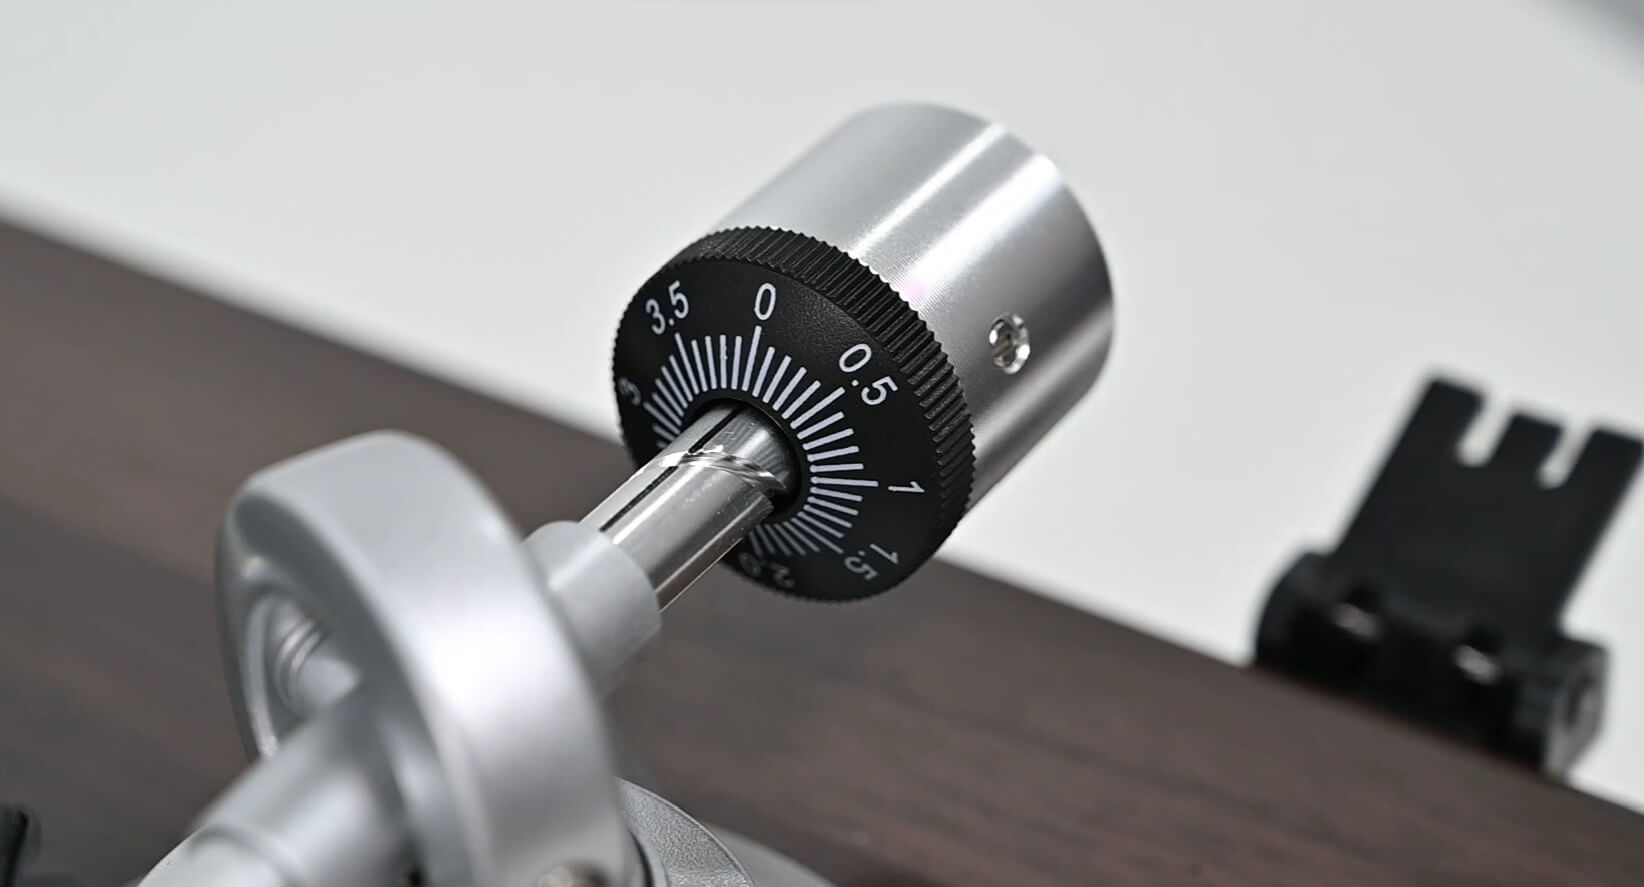
How to Set Anti-Skating on Turntable:

Adjusting or calibrating the anti-skate on the turntable is the simplest adjustment in the whole turntable setup series.
You just need to move the anti-skate dialer till the number matches the tracking force of your cartridge.
For example: Orthofon 2M blue recommended tracking force is 1.8g and now, you just need to set the anti-skate dialer to 1.8.
That’s it.
Frequently Asked Questions:
Q1- What should the tracking force be set at?
The tracking force depends on the cartridge you are using. Every cartridge has its own recommended tracking force that helps the stylus fetch audio signals from the grooves perfectly.
So, you should check the cartridge’s specifications in the manual or contact the manufacturer to know the recommended tracking force of the cartridge you are using.
Q2- How to tell if the tracking force is too much or too high?
If the stylus looks similar to the image below then your tracking force is way too high.
![]()
Well, the best way to check the tracking force is to use a stylus gauge and match the reading it outputs with the recommended settings of your cartridge.
Q3- How does tracking force affect the sound?
Too heavy tracking force will force the stylus to run deeper inside the grooves and that force won’t allow the stylus to move freely thus, you will hear distorted, scratchy, and muddy sound from your speakers.
And, in case of tracking force is too light, the stylus won’t maintain its position inside the grooves and it can jump over the records while spinning.
Both cases will affect the sound quality to a greater extent.
Thus, a perfect tracking force adjustment is required to hear perfect sound quality from your speakers.
Q4- How to Adjust tracking force Victrola & Crosley record players?
Victrola and Crosley record players don’t have a counterweight dialer so you can’t adjust the tracking force yourself. However, these units come with a pre-adjusted tracking force which weighs over 5 grams.
Q5- Is 3 grams too much tracking force?
According to the majority of audiophiles and my experience, tracking force above 3.5 grams is too much.
In the past, there were record players whose tracking force was over 5-6g and I have seen many people debating on the same fact and saying to everyone that tracking force over 3.5g is good.
So, to finish this debate once and for all, I have researched a lot and figured out that the majority of audiophiles consider tracking force over 3 grams too much.
On top of that, nowadays, the cartridge manufacturers have manufactured MM or MC cartridges that have recommended force ranging between 1.5g to 2.5g so there is no need to go over 3 grams.
We have shared the simplest guide to check tracking force, adjust tracking force, and anti-skate adjustment or calibration on your turntable. If you have questions, please comment below. We will get back to you as soon as possible.