 James Williamson
 Disclosure: This article contains affiliate links and as an Amazon Associate, we earn from qualifying purchases made through our links.
A turntable might look like a very complicated piece of equipment with many components that work together to produce the sound quality millions of people around the globe love.
However, due to its complexity, many users skip one of the most crucial steps: understanding the different parts of a record player or turntable and how they work together.
Even I was one of those who considered the record player complex equipment and ignored the need to understand its parts, which resulted in a very bad experience. Back in the 2010s, when I was a beginner in the vinyl world, I had a vintage record player with some motor issues.
As a student, I tried to save some money and attempted to repair it myself, but all my efforts went in vain when I accidentally damaged the circuit board, for which I had paid double the actual repair cost. Well, all of this happened due to a lack of understanding of the components.
After this incident, I learned the skills to repair record players and turntables, which have helped me fix minor and major issues, such as bent or worn-out styluses, motor problems, internal grounding issues, replacing belts, changing styluses and cartridges, and more, on my turntables and record players.
Well, all these encounters helped me understand the turntable, its components, the role of each element, and how they work together in a much better way.
But, from a beginner’s perspective, a question is always there, i.e., is a turntable too complex to understand?
Well, the answer is no.
A turntable is a very simple piece of equipment that can be understood when you try to understand its roots, i.e., its parts. So, to help you understand everything about turntable parts, I have drafted this article in which I have explained each part along with its name, its purpose, and how they are linked together.
After learning the components, you will have enough knowledge to encounter issues like replacing a cartridge or stylus, changing the turntable belt, speed measurement, speed adjustment, and much more yourself.
So, let’s get started.

AT-LP60X-BK with Edifier R1280DB speakers
A beginner-friendly combo to kickstart your vinyl journey — no extra phono preamp or amplifier needed!
- Beginner-friendly
- Complete plug-and-play setup
- Fully automatic turntable
- High-fidelity sound
- Sleek design and easy to use
Record player and turntable parts:
A record player and a turntable are two separate units.
In short, a record player is a single unit that has a turntable, speakers, amplifier inside a single box. Whereas a turntable doesn’t have a built-in amplifier and speakers. To learn more about these devices, we have posted a comparison article: turntable vs record player, from which you can learn the in-depth difference between both units.
To simplify things, we have talked about both units separately.
First, we are going to talk about the parts of a suitcase record player, and after that, we are going to talk about turntable parts.
Parts of a record player (Anatomy):
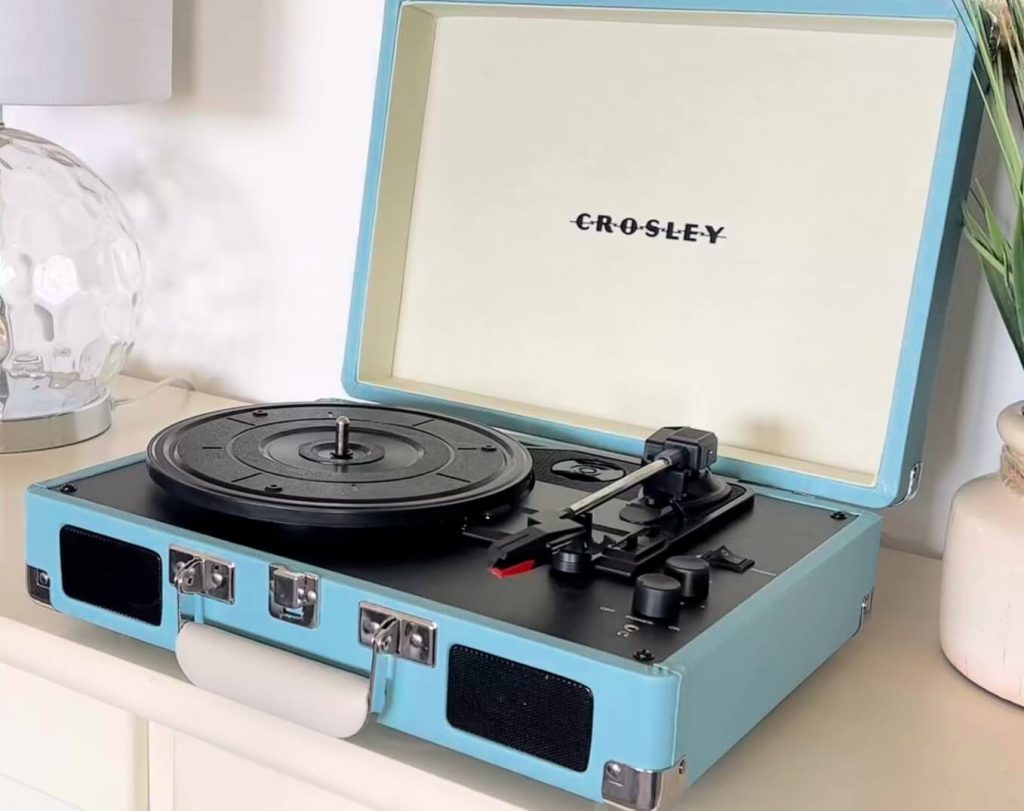
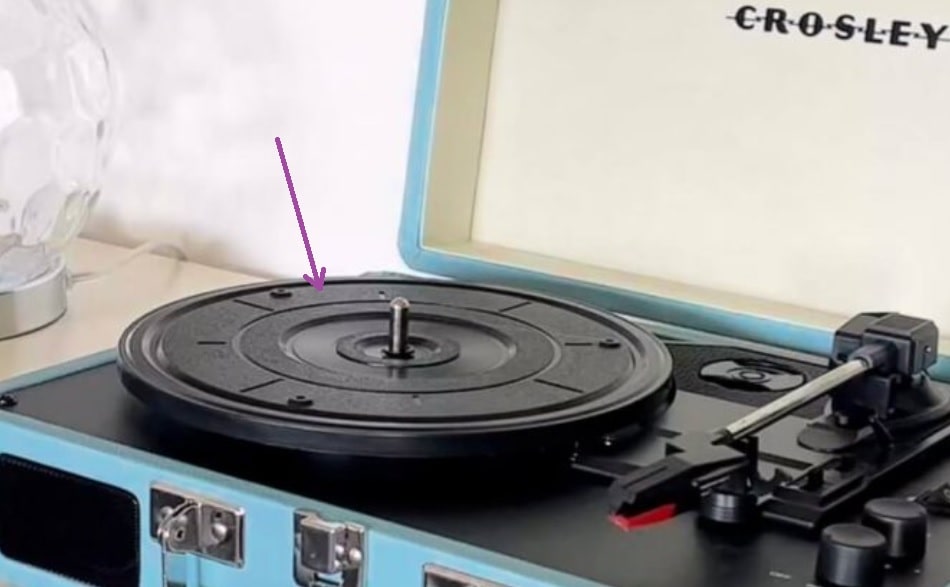
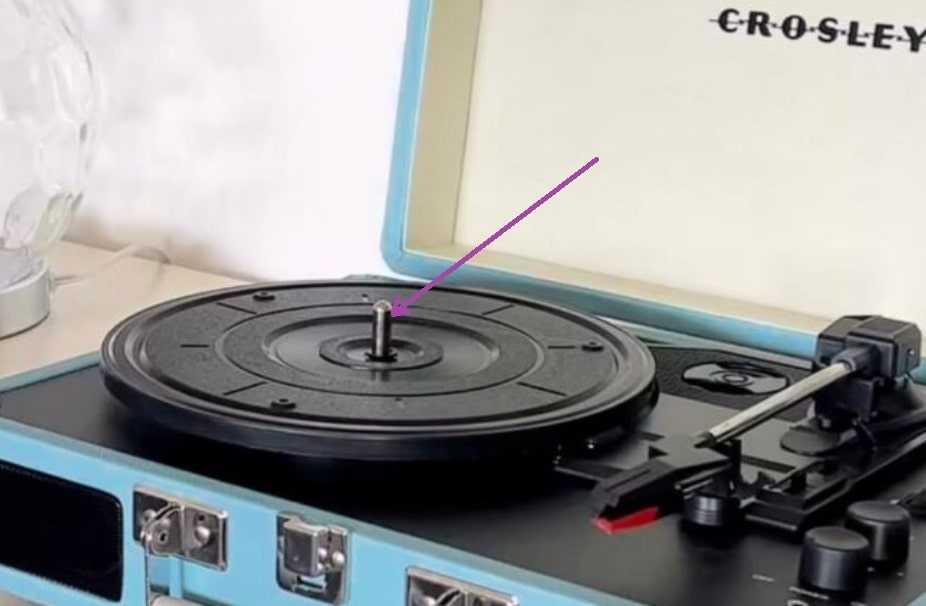
We have used the Crosley Cruiser suitcase record player as an example to help you understand the components of a modern record player. If you want to know about any part of the vintage record player, then you can comment below, and I will help you out in the comments.
1) Platter
A turntable platter is a spinning platform where you place your vinyl or shellac records. It is detachable, and underneath the platter, you will find the motor’s belt and drive shaft. This platter can be made up of plastic, glass, acrylic, metal, aluminum, etc.
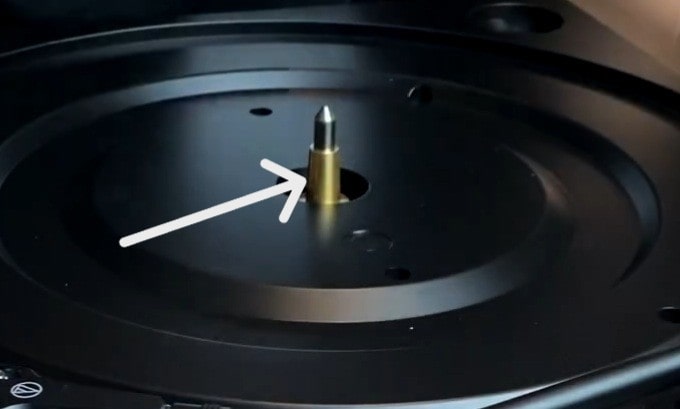
2) Spindle
A spindle is a small metal rod placed in the middle of the platter that holds your record when it spins. In belt drive units, the spindle is attached to the body, but in direct drive units, the spindle is the end of the motor’s drive shaft.
3) Plinth
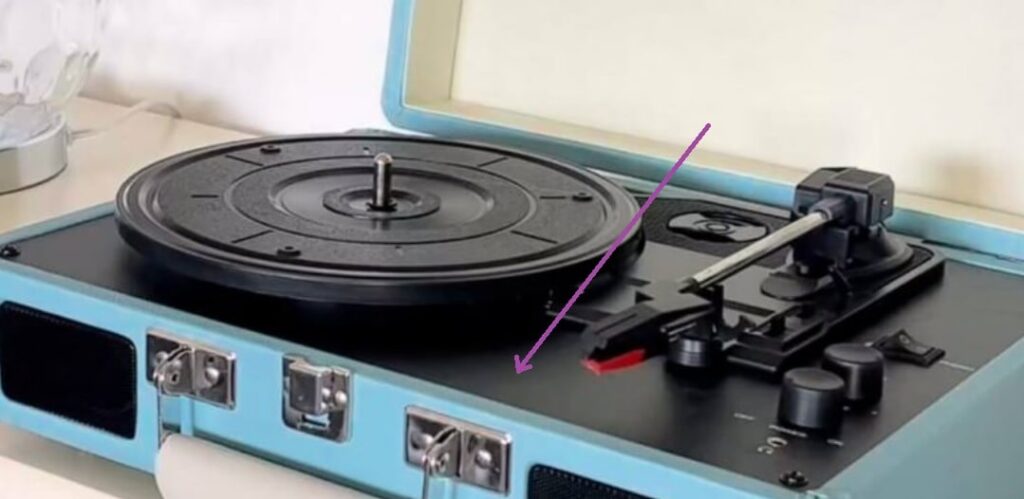
A plinth is the base to which all other components are attached. It can be made up of plastic, wood, and metal. Under the plinth, you will find the hidden wiring, circuit boards, speakers, and other important components required for smooth operation.
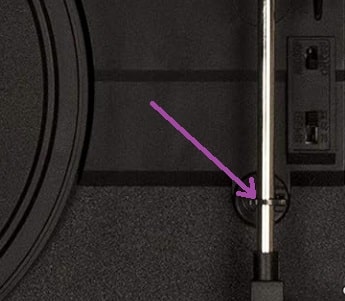
4) Belt
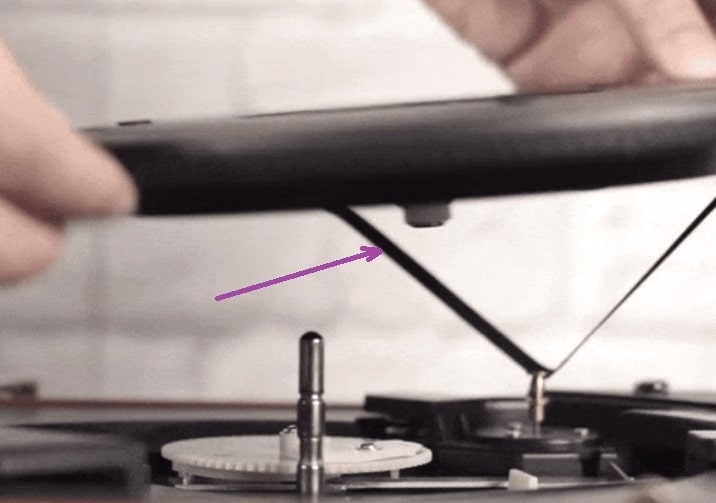
The belt is responsible for spinning the platter. In most units, it is connected to the platter and the motor’s drive shaft underneath the platter, but in some units, the belt is rolled from the platter’s end to the motor’s drive shaft, making it visible on the plinth. (For example: Orbit turntables). I recommend you check out this guide on changing record player belts to learn more about belts and their position on shafts.
5) Motor’s drive shaft

The motor’s drive shaft is the place where the belt is attached to the motor. In modern-day units, the motor itself is responsible for the platter’s speed, but in some vintage units, the thickness of the drive shaft is responsible for the platter’s speed.
6) Tonearm
The tonearm is one of the most crucial parts of a record player. It holds a phono cartridge at one end, and the other end is connected to the plinth.
The tonearm’s role is to transfer the signals generated by the phono cartridge to the preamp and then speakers. It is also responsible for the cartridge’s tracking force on the record.
7) Tonearm lever
The tonearm lever or cuing lever helps in engaging or disengaging the tonearm rest that raises or lowers the tonearm over the record, which reduces the risk of damaging the stylus when done manually.
8) Tonearm rest
The tonearm rest is the resting place of the tonearm, which engages and disengages when you play with the tonearm lift lever. It raises and lowers the tonearm.
9) Phono/Bluetooth switch
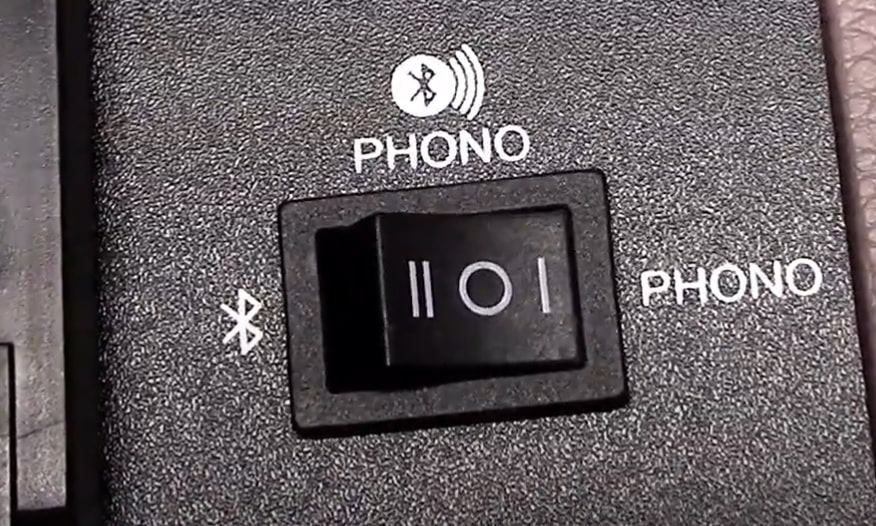
So, there are three modes here:
Phono mode (I):
You can listen to your vinyl through the unit’s internal speakers. To activate phono mode, press the switch to the right side.
Phono/Bluetooth mode (O):
Your unit will be ready to get paired with external Bluetooth speakers, and after successful pairing, you can listen to your vinyl records on external Bluetooth speakers. To activate phono/Bluetooth mode, the switch should be in the middle.
Bluetooth mode (II):
Your unit will act as a Bluetooth speaker for external devices. In this mode, you can’t listen to your vinyl record; instead, you can connect your mobile phone or any other output device to your unit and listen to music through internal speakers. To activate Bluetooth mode, press the switch on the left side.
10) Auto-stop switch
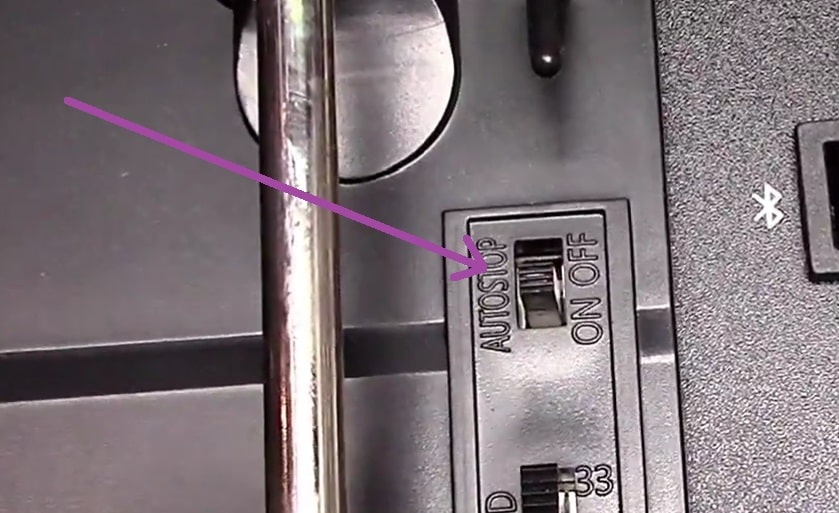
The auto-stop switch is a life-saving feature for vinyl enthusiasts like me who forget to turn off their units when the record plays to the end. When turned on, it stops the platter from spinning when the record is finished, which helps in avoiding major damage to the stylus and records. In case it’s turned off, then the platter will keep spinning even when the record is played to the end, which can result in stylus damage.
11) Speed switch
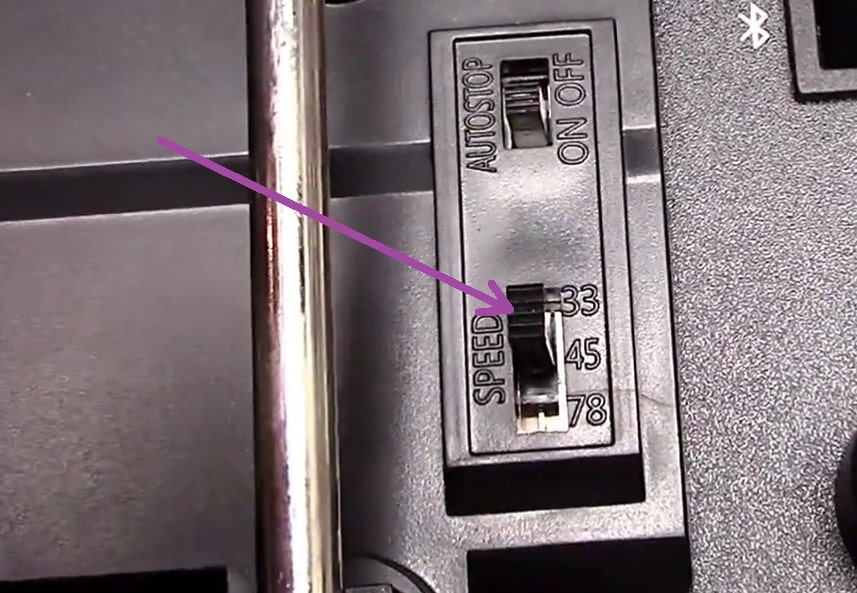
Through the speed switch, you can easily play 33(1/3) vinyl, 45 RPM vinyl, and even 78 RPM shellac records.
Learn more about the difference between these speeds from this article: 33 vs 45 vs 78 RPM vinyl record speed comparison.
12) Pitch control
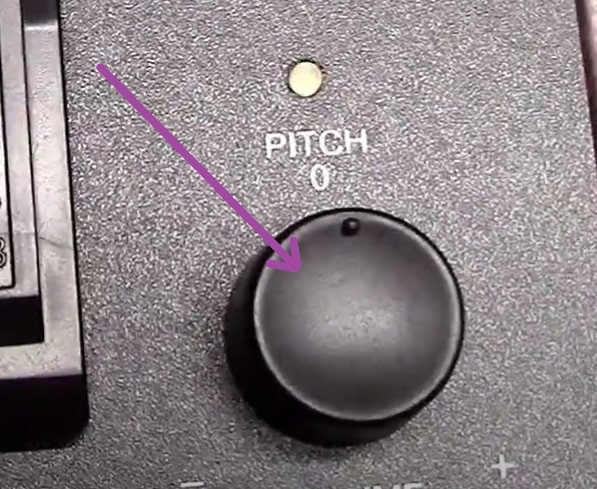
The pitch control helps in increasing or reducing the platter’s speed by approximately 10%.
Rotating the dial clockwise increases the speed, and similarly, rotating the dial counterclockwise reduces the speed.
If you want to adjust the platter’s speed and there is no pitch control dial up there, then you can tweak the motor manually. You can learn about record player speed adjustment from this article.
13) Hold down clip
The tonearm hold-down clip is a safety feature that holds the tonearm in one place. It helps us to stop the tonearm from bouncing on other components when we are carrying our units to different places.
14) On/off and volume knob
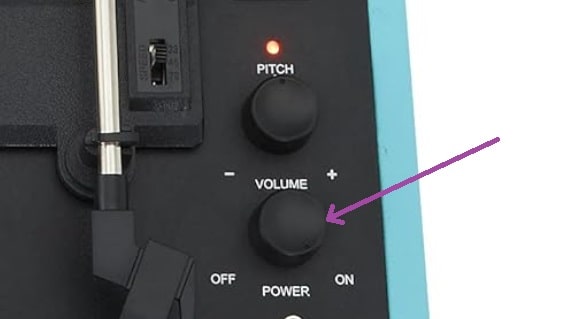
Almost all suitcase vinyl players don’t have a separate turn-on/off button. You will get a volume knob through which you can turn on/off your unit and adjust the speaker’s volume too.
15) Headphone jack
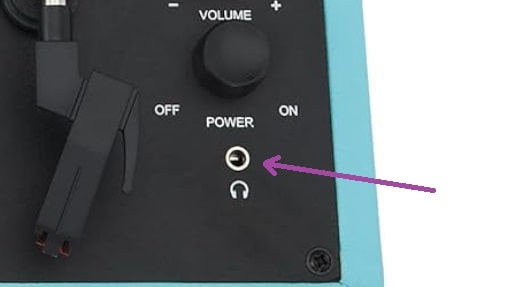
You can connect your headphones and listen to your vinyl privately.
16) 3.5mm aux in jack
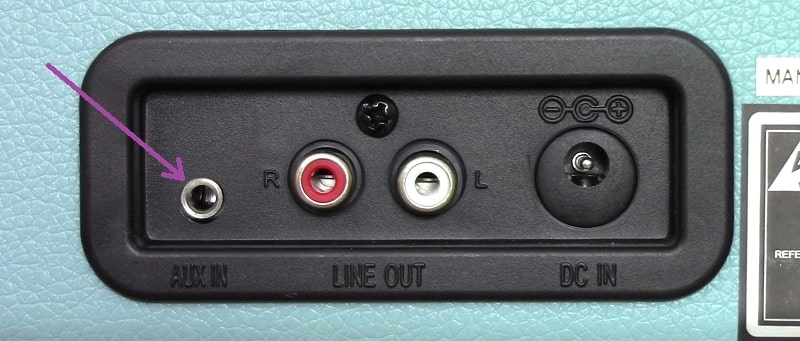
Through an aux-in jack, you can connect an external device to this unit and listen to the music through the unit’s internal speakers.
17) RCA jacks
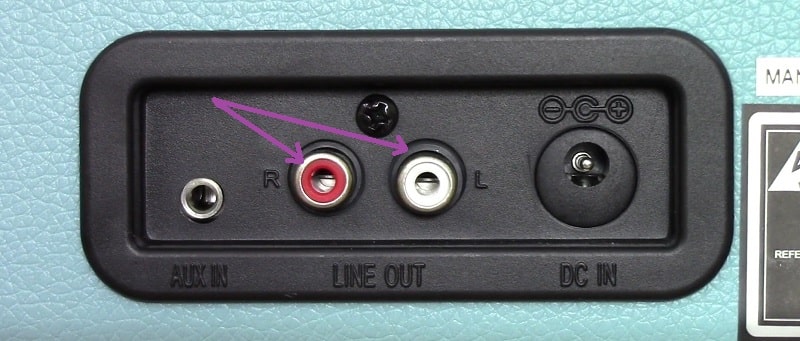
The RCA jack helps you to output the vinyl sound to external speakers. As we have discussed many times, the internal speakers of these units are of bad quality, so this RCA feature helps us to listen to our vinyl on better quality speakers.
It outputs line-level signals so you can connect the other end of the RCA cable to the line-level input of passive or active speakers.
Learn more about signals from this article: the difference between phono level and line level signals.
18) Power jack
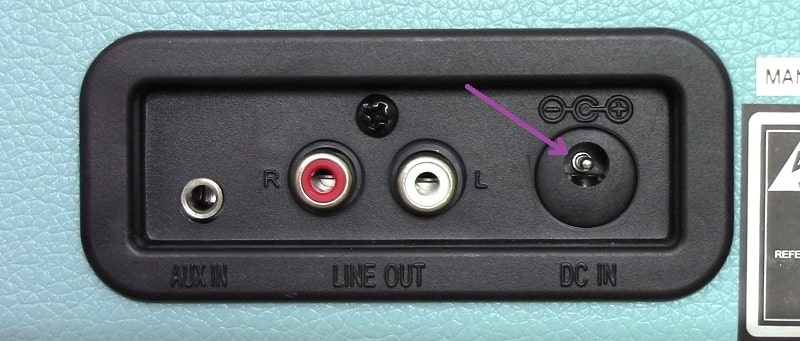
A jack where you can connect the power adaptor and supply electricity to the unit.
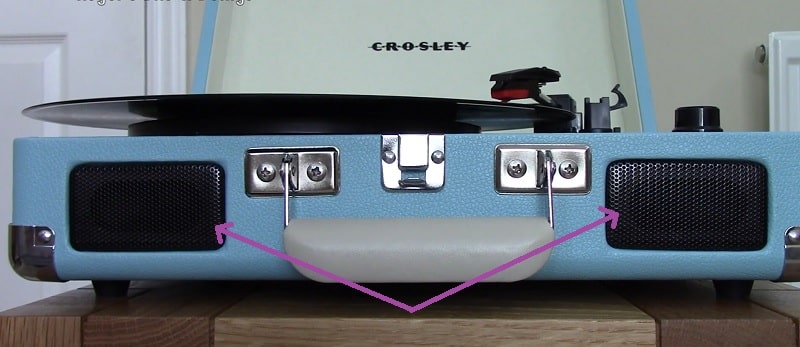
19) Speakers
Parts of a Turntable (Anatomy):
Well, I have used the Audio-Technica AT-LP120XUSB turntable, which also made it place on our list of best turntables under $500 as an example here, because this turntable has almost all the features that a beginner should know about.
A turntable has many additional and advanced features compared to a record player. So, I have divided the anatomy into six parts:
- Top view
- Rear view
- Tonearm parts
- Phono cartridge parts
- Internal parts
In each section, you will see the turntable part names and descriptions.
So, let’s start.
Top View:

1) 45-RPM adapter
The 45 RPM adapter is a circular plastic piece that fits over the spindle, allowing 7-inch records to be played on your turntable.
If you have seen 7-inch and 12-inch records, then you might have noticed that 7-inch records have a comparatively bigger hole in the center.
Well, the reason behind a bigger role is jukeboxes.
Jukeboxes are coin-operated music-playing devices. These were kept in cafes, bars, and other public places. These devices have a specific media library based on vinyl records and CDs kept inside, and people can insert a coin into the machine, select any music from the library, and enjoy it.
It was a very trending music listening medium back in the 1940s to 1960s, and 7-inch records were manufactured for these devices.
Nowadays, you won’t find these jukeboxes easily, and to adjust these bigger hole records on our small tip spindle, we use a 45 RPM adapter.
2) Strobe dots
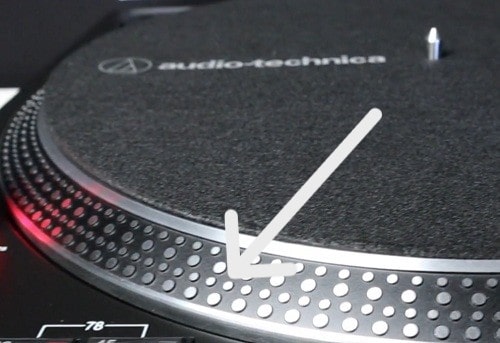
Strobe dots help us to measure the speed of the turntable. You can learn about strobe dots and disks in this article.
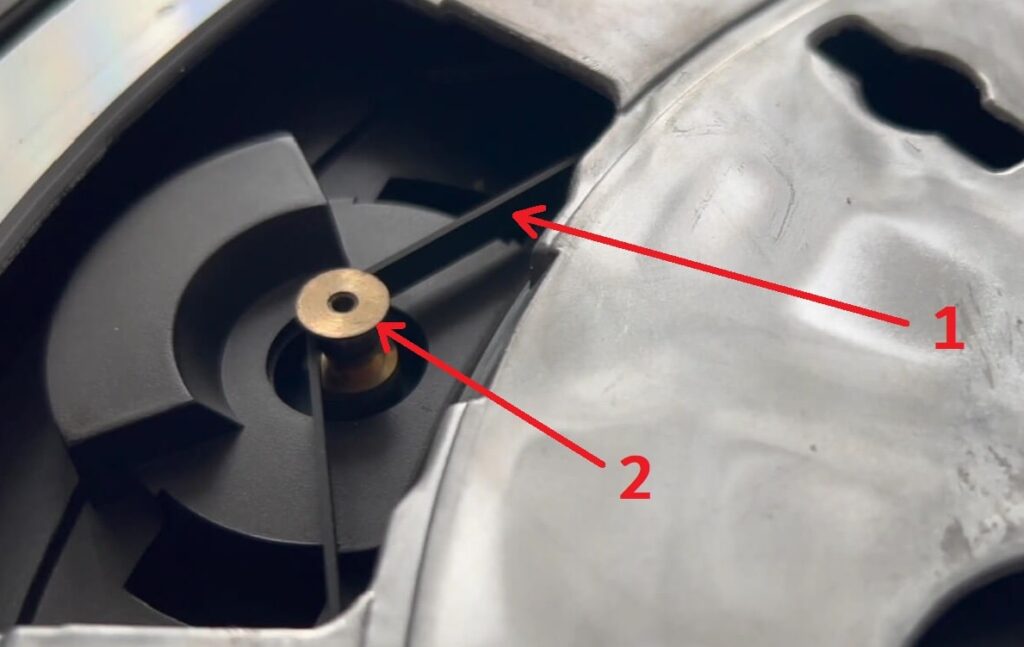
3) Spindle
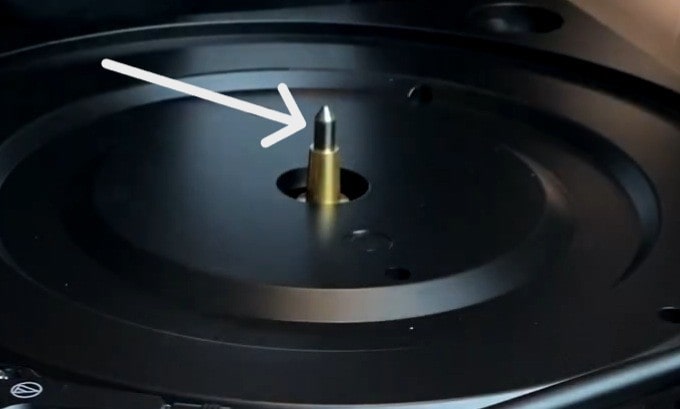
The spindle is a small metal rod in the middle of the platter that holds the records in place while the platter is spinning. This is attached to the turntable’s body.
In the direct drive turntable, the spindle is the end of the motor’s drive shaft, but in the belt drive turntable, the spindle is not attached to the motor.
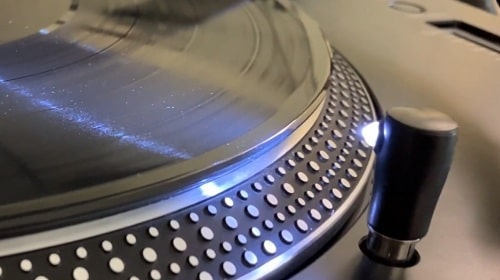
4) Platter
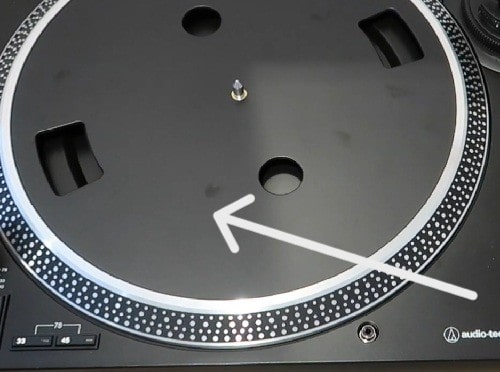
A platter is a platform where your record sits and spins. This is a separate removable component with a hole in the center that you can place over the spindle.
5) Strobe light turn on/off button
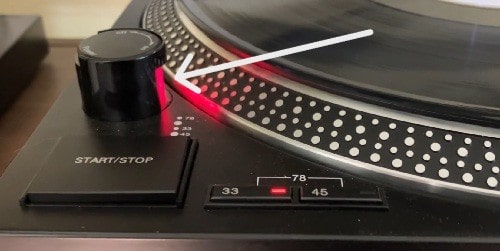
You can turn on/off the strobe light of the turntable.
6) Start/Stop button
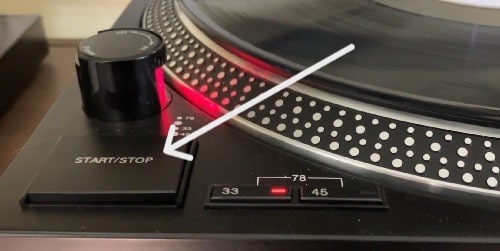
Helps you to start/stop your turntable with a single button press.
7) Platter Speed Buttons
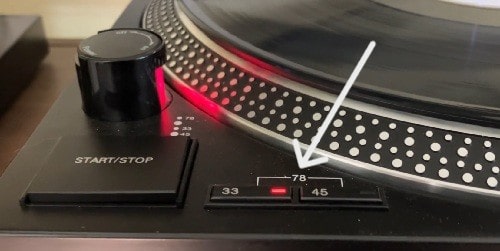
The speed buttons help you adjust the platter’s speed according to the vinyl record.
If you are playing a 33⅓ rpm record, you can select 33, or if a 45 RPM record is being played, then you can select 45.
The 33RPM and 45RPM speed options are available in all the turntables, but there is one more speed, i.e., 78RPM, which is available on selected units. In AT-LP120XUSB, you will get a 78RPM speed option which can be selected by pressing both buttons, i.e., 33 and 45 at the same time.
8) Slip mat (Felt mat)
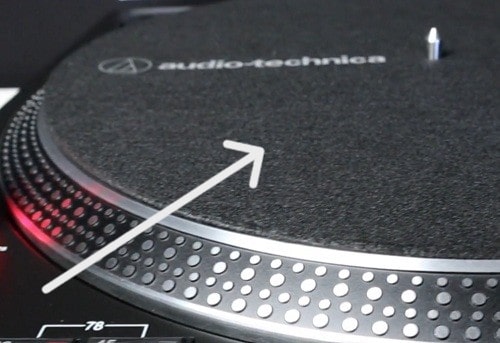
A slip mat is just like a patty in burger buns, i.e., it is placed in the middle of the platter and vinyl record. You will find slip mats built with different materials like rubber, cork, leather, etc, and every single one has its characteristics. The selection of a slip mat depends on personal preference, and I prefer a cork mat.
9) Removable stylus target light
A light that helps us to know the exact stylus’s landing position on record while cueing in low light. This light is easily removable.
10) Quartz button
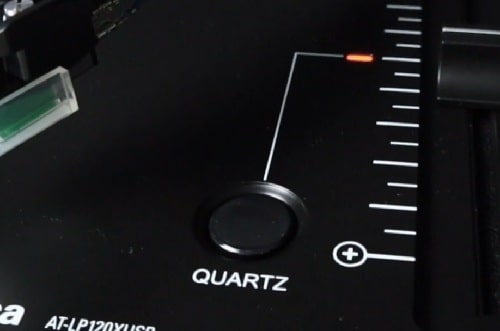
The quartz button helps to enable/disable the pitch feature.
When you turn it on, your platter will hold the RPM at 0% pitch, regardless of where your pitch slider is or your current tempo range control settings.
11) Pitch selection indicator
It indicates whether the quartz button is engaged or disengaged, or in simple words, RPM settings are locked or not. It turns red when these settings are locked.
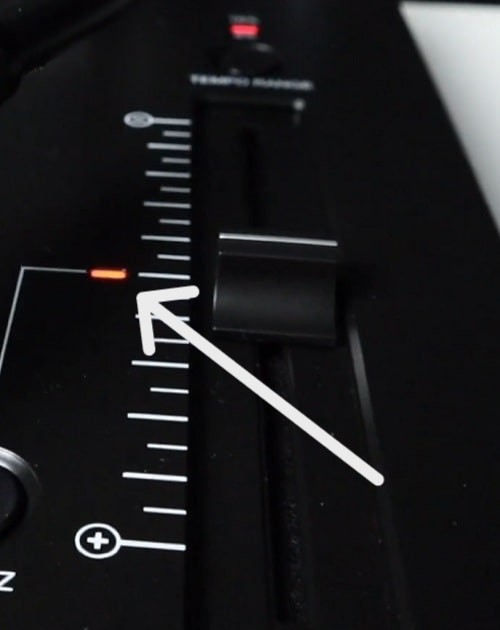
12) Pitch adjust slide control

Through the pitch adjust slide control, you can increase or decrease the turntable’s speed. This is an advanced feature suitable for DJs.
You can learn how to adjust pitch control settings with this article.
13) Tempo range button
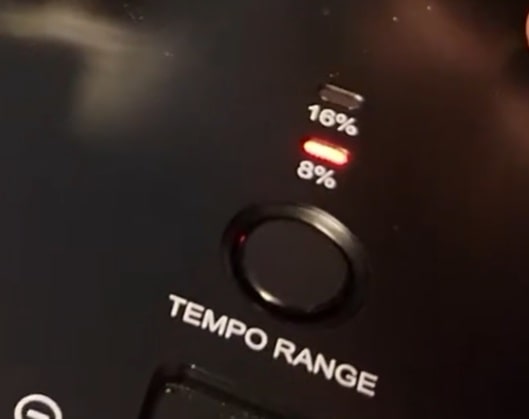
The tempo range button helps in determining the change in speed by playing with the pitch adjust slide control.
It’s also a DJ feature, and this turntable supports an 8 or 16% tempo range. You can adjust the settings, i.e., determine the percentage of change in pitch when playing with the pitch adjust slider.
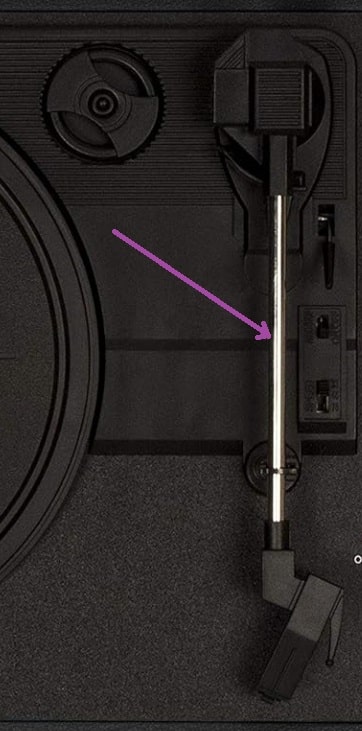
14) Tonearm
Well, I consider the tonearm as the heart of the turntable. It has components that work together to generate the amazing sound that we all love. It is also referred to as a turntable arm by many people. You can learn more about the parts of the tonearm here.
15) Headshell receptacle
Just an additional storage for your extra headshell, in case you have one.
16) Dust cover hinge holders
The turntable’s dust cover is attached to these hinges.
17) Plinth
The plinth is the base of the turntable. It is made up of wood, plastic, metal, and acrylic. The whole turntable’s components are built on top of it.
Rear View:
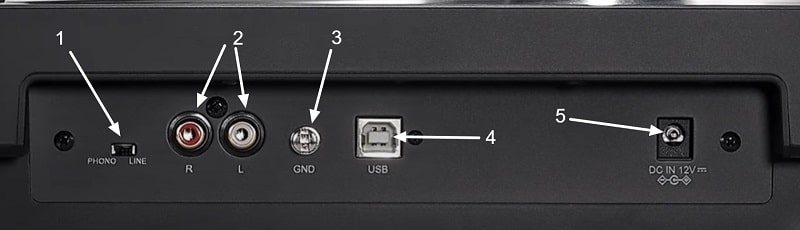
1) Phono/line switch
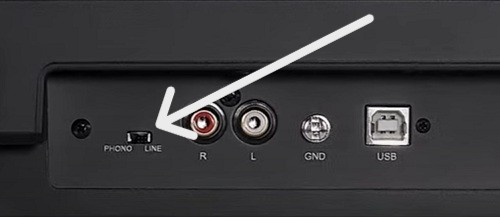
The phono/line switch indicates whether your unit has a built-in phono preamp or not.
Turning the switch to the line engages the built-in phono preamp, and similarly, turning the switch to phono disengages the phono preamp.
If you have any confusion about phono preamp or line/phono signals, then I recommend that you check out these articles and understand the concept of phono preamp and phono vs line level signals.
2) Stereo output terminals
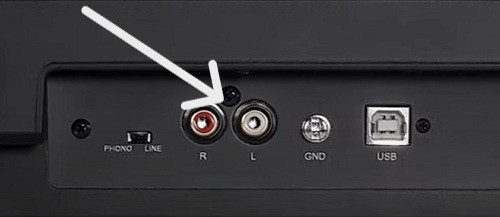
You can connect the RCA cables in these terminals and transmit the turntable’s output to either an external phono preamp, active speakers, or stereo receiver/amplifier, depending on your setup.
3) Ground (earth) terminal
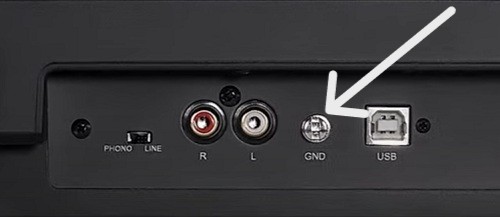
GND terminal helps you to ground your turntable and eliminate the hum, minimize the risk of short-circuit, and damage that can help to setup due by voltage spikes.
Well, grounding is very crucial and should be done properly. Well, we have a separate detailed article: how to ground a turntable, in which we have discussed grounding, its importance, and how to ground based on different turntable setups.
4) USB Output
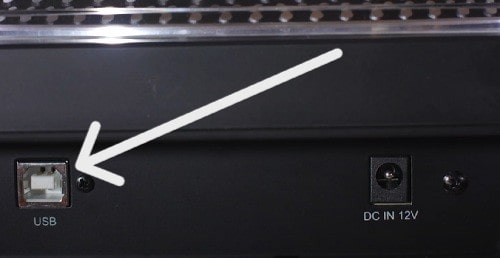
USB feature is an advanced feature that allows you to record from your turntable directly to your computer or laptop.

You can connect the turntable to your Mac, Windows, or Linux laptops/desktops without any special drivers by using a USB cable. The type of cable requirements depends on your PC or laptop.
5) Power Input Jack
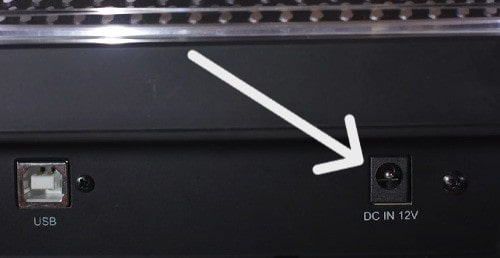
An input jack to connect your AC adapter and supply power to your unit.
Parts of the Tonearm:
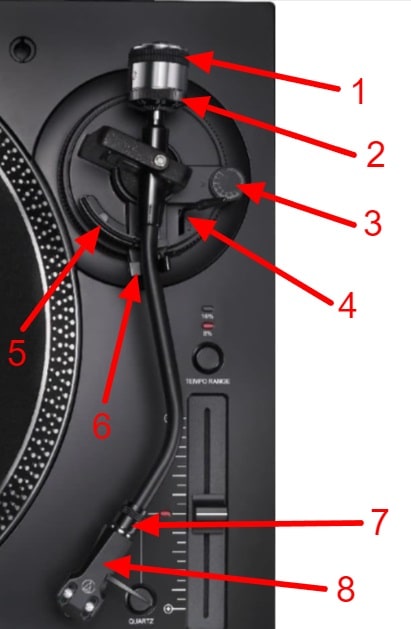
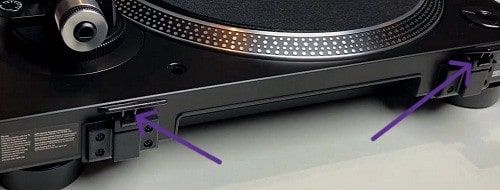
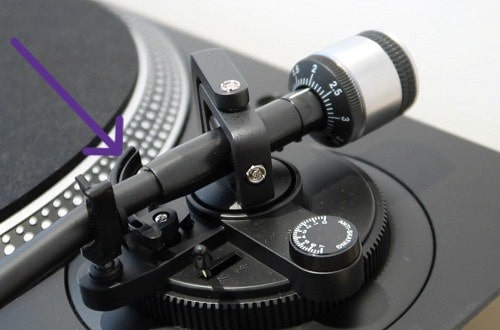
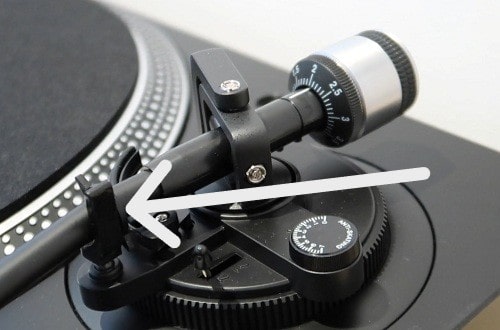
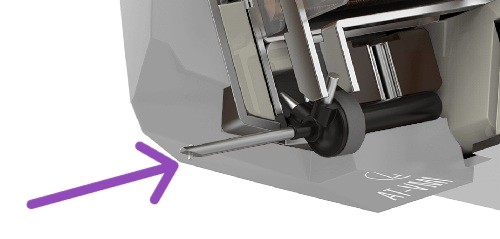
1) Counterweight
The counterweight helps in balancing the tonearm.
Turning the counterweight towards the tonearm’s pivot point increases the weight, and the cartridge moves towards the platter, whereas turning the counterweight away from the tonearm’s pivot point reduces the weight and the cartridge moves away from the platter.
The perfect adjustment is required to make the tonearm parallel to the platter. We have already published a guide: how to balance a tonearm, through which you can learn every aspect and the rules to balance the tonearm.
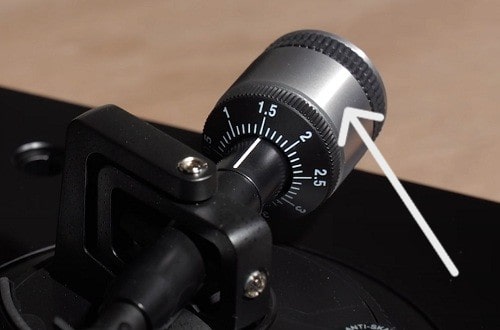
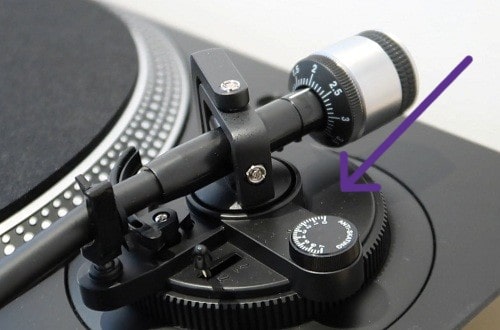
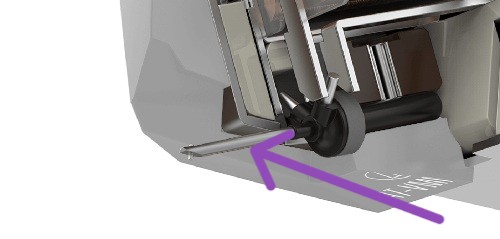
2) Tracking force gauge ring
![]()
Tracking force is a very important metric that helps the stylus to stay inside the record grooves and fetch audio signals properly. And, the adjustment of the tracking force is done with the help of the tracking force gauge ring.
Learn more about tracking force adjustment in this article.
3) Anti-skate control dial
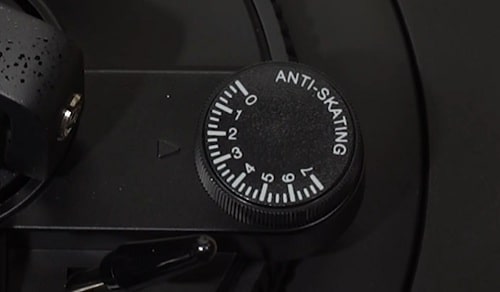
The anti-skate feature helps the tonearm fight against the natural skate force that pulls the tonearm toward the spindle.
This feature puts outward force on the tonearm against natural skate force, which makes the balance and helps the stylus to maintain its position in the center of the groove.
We have explained everything about this concept and why it’s used here: Anti-skating settings. I recommend you read it.
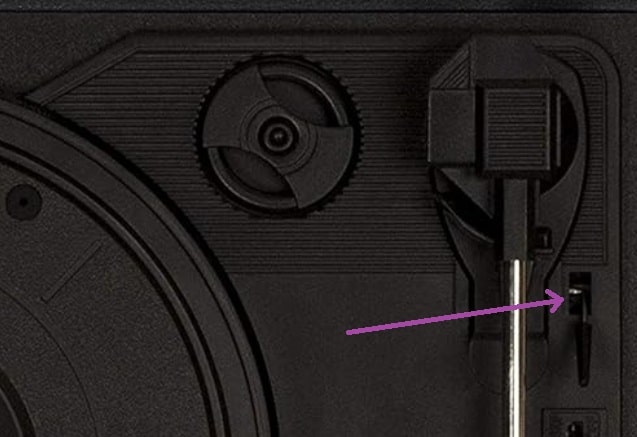
4) Tonearm lift control lever (Cuing lever)
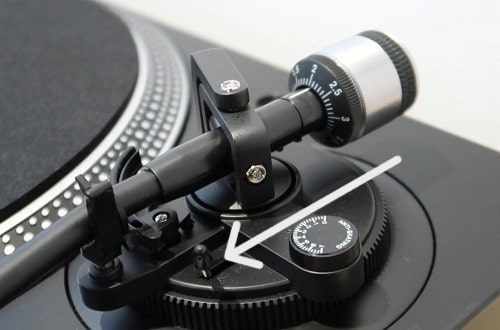
The tonearm lift control lever, also known as the cuing lever, helps us to engage or disengage the tonearm lift.
5) Tonearm lift
The tonearm lift is a small plastic surface under the tonearm that moves upwards and downwards with the help of a cuing/tonearm lift control lever.
This feature helps us a lot in lowering the stylus over the record delicately. Before this feature, we used to place the tonearm over the record manually, which had a slight chance of damaging the stylus.
6) Tonearm Rest With Clamp
It’s a resting place for the tonearm when you aren’t using the turntable. The clamp is an additional security measure that helps the tonearm to stick to its resting position, so, in case of transportation or moving the unit, the tonearm stays in its place.
7) Height adjustment dial
While playing thick records, you might need to adjust the tonearm height to make the tonearm parallel to the platter. Through the height adjustment dial, you can simply rotate it clockwise or counterclockwise to play with the tonearm’s height. Some turntables also have a feature called “Height lock” through which you can lock the selected height, while some don’t need any lock.
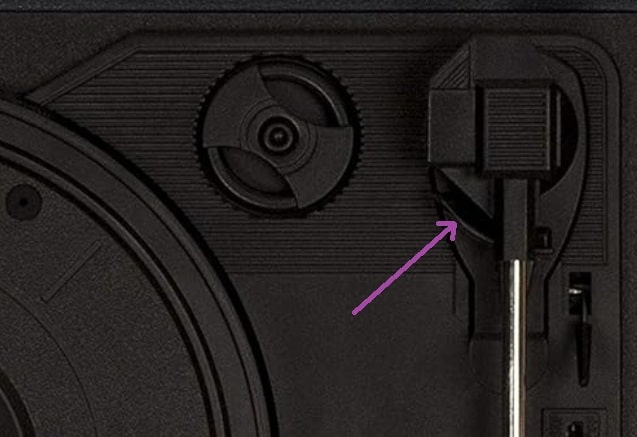
8) Locking Ring
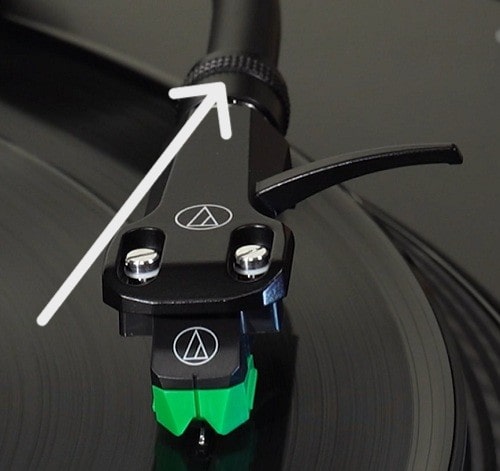
The locking ring is a rotatable piece of plastic/metal that helps us attach the headshell to the tonearm. Rotate the ring counterclockwise to lock the headshell and rotate the ring clockwise to remove the headshell.
9) Headshell
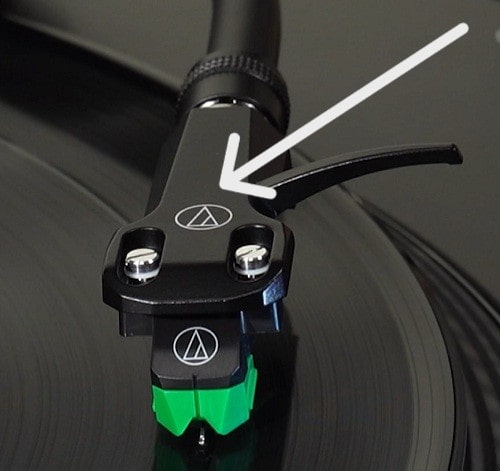
The cartridge is attached underneath the headshell.
Phono cartridge parts:
There are six main components of a cartridge:
- Stylus
- Cantilever
- Electric signal generation system
- Suspension system
- Terminals
Here, we have discussed three major components, i.e., stylus, cantilever, and electric signal generation system, briefly. If you want to know about all components in-depth, I suggest you check this article: parts of a phono cartridge. We have covered everything about phono cartridges, their types, parts, and how to work.
Now, let’s talk about the first three crucial components:
1) Stylus
The stylus is a small tip at the end of the cantilever that runs inside the grooves and fetches the audio signals.
2) Cantilever
The cantilever is a small metal rod whose one end is connected to the cartridge body and the other end is connected to the stylus.
It transfers the vibrations that the stylus generates while running inside the grooves of records to the electric signal generation system inside the cartridge body.
3) Electric signal generation system
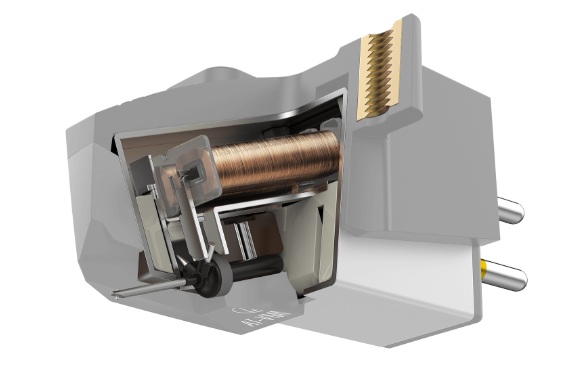
The cartridge body is where the magic happens, i.e., conversion of vibrations to electric signals. There are different electric signal generation systems:
- Moving magnet cartridges
- Moving coil cartridges
- Moving iron cartridges
- Moving micro cross cartridges
- Ceramic cartridges
Out of these, the two most popular ones are: moving coil and moving magnet. To learn the difference between these, I recommend reading mm vs mc cartridges article, in which we have covered everything in-depth.
Internal Parts:
Now, we are going to talk about some internal parts.
1) Drive mechanism:
There are two types of drive mechanisms in a turntable:
Belt Drive
Here, a belt is responsible for spinning the platter. Some turntable manufacturers hide the belt and motor’s drive shaft underneath the platter, while some don’t.
Direct Drive:
Here, the motor’s drive shaft is directly connected to the platter from underneath. There is no need for the belt in this drive mechanism.
2) Motor
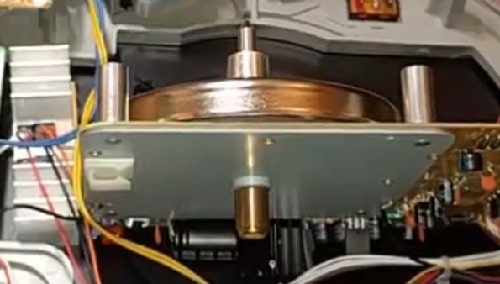
The motor is responsible for spinning the platter at the configured speed.
That’s it.
Frequently Asked Questions:
Q1- What is the most important component of a turntable?
The tonearm and phono cartridge are the most important components of a turntable.
Q2- What is the stick on a record player called?
The long stick on the turntable is known as the tonearm. The tonearm with the cartridge is considered the heart of a turntable.
Q3- What is the record player arm called?
The name of the turntable arm is tonearm. You can learn more about the tonearm and its parts from here.
Q4- What is the most common part of a turntable that will need to be replaced?
The stylus is the most common part of a record player that will need replacement after some time.
Q5- What is the needle thing called on a record player?
The needle thing on a record player is known as a stylus. A stylus is responsible for fetching the audio information from vinyl records. To learn how music is played from the physical grooves of a record, check out this article: How do vinyl records work?
Q6- What is the pad on a record player called?
The pad is called a slip mat. The split mat helps in preventing record slipping, scratches, and static electricity. It also helps in dampening the vibrations.
Q7- What is a record player disc called?
A record player disc is known as a vinyl or shellac record.
We have shared and explained all the different parts of the record player and turntable. If you have any questions about the anatomy of both devices then please comment below. We will get back to you as soon as possible.


I have a new Retro Record player Model A6 and have no way to power it up.be The cord as been lost and need to order a new adapter DC-5V/1.0A How do I go about to receive this part.
As you have information about compatible adapter, you can visit any record shop nearby or contact any professional who repairs turntable or record player, they will help you out.