James Williamson
 A turntable phono cartridge is the most important part of the turntable, without which you can’t listen to your vinyl records, and it also plays a crucial role in your setup’s sound quality.
Understanding cartridges is required to tweak your setup and aim for perfect sound quality, which is why people come into the vinyl world.
As we all know, vinyl records have audio information stored on them in the form of physical sound waves, also known as record grooves, and to fetch audio information from these grooves, a turntable cartridge is used. And how effectively audio information is fetched from record grooves depends on the quality of the cartridge used in the setup.
Well, despite being such an important component, I haven’t seen many articles that explain the cartridge working concept in detail, and even most of the online resources only cover moving magnets and moving coil cartridges, while there are 3 more cartridges that you should know about.
So, to make you understand the turntable pickup role and its concept properly, I have drafted this beginner-friendly article in which I have explained everything about cartridges, how these work, how electric signals are generated by cartridges, and different types of cartridges. You will also find an explanation of the design and engineering of each cartridge with its diagram.
So, let’s start with the first question.
What is a Phono Cartridge?
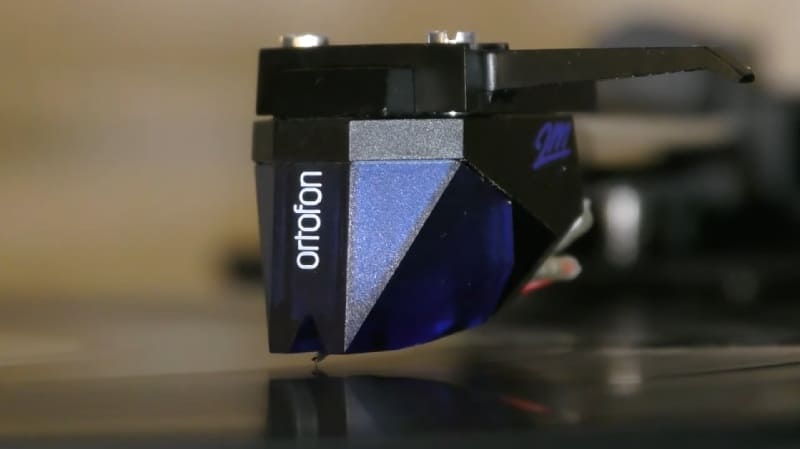
A turntable cartridge, also known as a phono or pickup, is a turntable component that picks up vibrations from the physically engraved sound waves of a record, known as record grooves, converts these vibrations into electrical signals, and transmits the converted electrical signals to the phono stage through the tonearm. These electric signals are further amplified by stereo receivers and converted to sound through the diaphragm of speakers.
In simple words, it is an electromechanical transducer that converts vibrations into electrical signals, and its only purpose is to generate electrical signals from the vibrations caught by the stylus while running inside the record grooves.
So, this is the brief description of the cartridge, but to understand the working concept, we first need to know what’s inside the cartridge’s body and how these components work together.
What are the parts of the cartridge?
There are six main components:
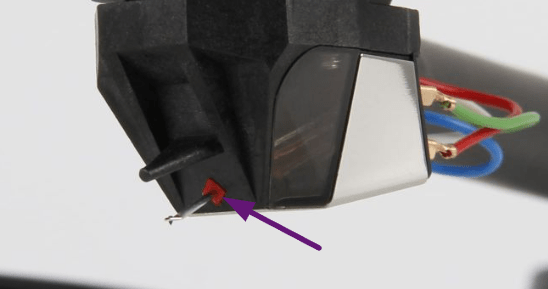
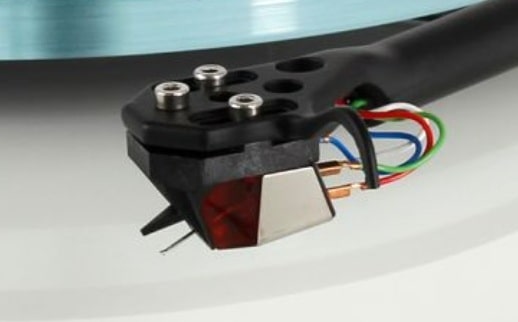
Stylus
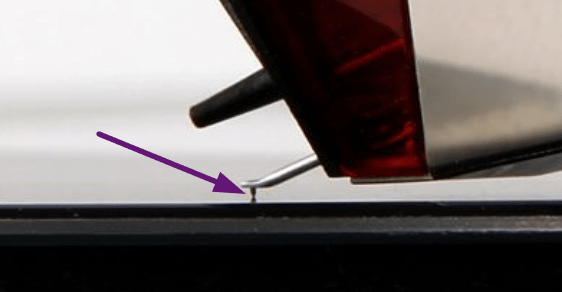
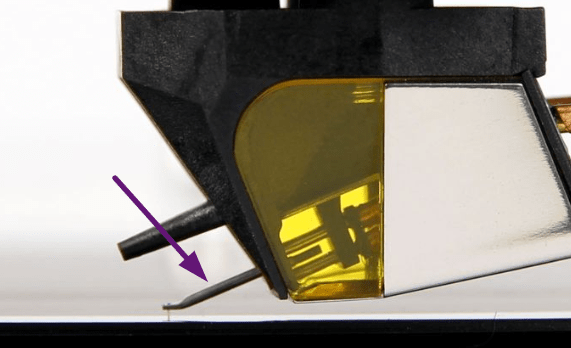
A stylus, also known as styli or needle, is a small tip attached to the end of a cantilever, and it’s the only component of a cartridge that comes in contact with record grooves.
Role:
The stylus runs inside the record grooves to catch the audio signals in vibration form.
Cantilever
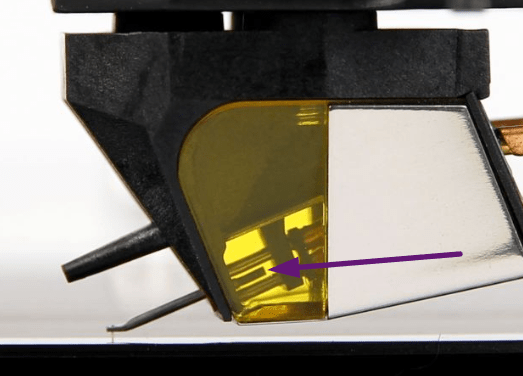
A cantilever is a small rod that houses a stylus at one end and magnets/coils/iron on the other end.
Role:
The cantilever transfers the vibrations generated by the stylus to the electric signal generation system inside the cartridge’s body.
Electric signals generation system (Coils, magnets, iron, or ceramic elements)
The electrical signal generation system converts the vibrations into electrical signals. The generation system depends on the cartridge. I have shared the in-depth description of different types of cartridges below.
Suspension system
The suspension system, made up of a rubber or elastic material that is attached to a point where the cantilever comes in contact with the cartridge body.
Role:
This system helps the stylus to maintain its position inside the record groove and move freely.
Terminals
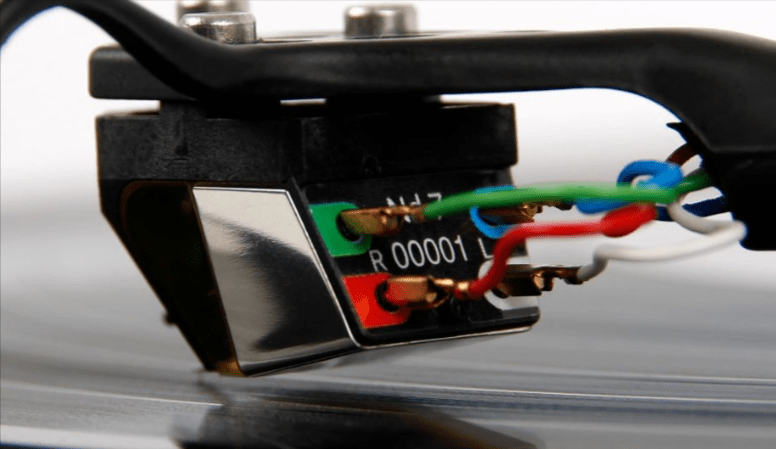
There are four terminals behind the cartridge’s body, which have their universal color coding:
| Universal color code | Channel info |
|---|---|
| Green | Right negative/ground (R-) |
| Red | Right positive (R+) |
| Blue | Left negative/ground (L-) |
| White | Left positive (L+) |
Mount Type
There are five different mount types:
Standard or half-inch (½) mount
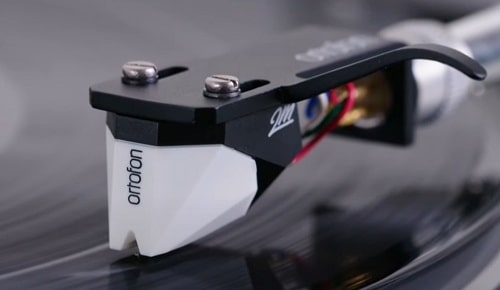
These are the common mount type in which the cartridge is attached to the headshell though screws and the tonearm connectors are connected to terminals through wires.
These are known as standard mounts. And due to the space between mounting holes being ½ inch, it’s also known as a half-inch mount.
P-Mount or T4P mount
P-Mount cartridge is a plug-and-play type of cartridge mount. It can be attached directly to the supported tonearm without terminal wiring.
Integrated mount
Integrated cartridges are fixed to the headshell directly. You can’t remove them without removing headshells.
Universal Mount
Universal mount refers to a mount where an adapter can be attached to p-mount cartridges to convert them to a standard mount. In simple words, a universal mount adapter will convert your p-mount cartridge to a standard or half-inch mount cartridge. These adapters are designed for flexibility for people having multiple turntable setups.
Own mounting system
Some turntable and cartridge manufacturers prefer making their own mounting system. For example, the Rega Exact cartridge has a three-point mounting system.
Well, this is the brief description of the components inside the cartridge’s body.
Now, let’s discuss how cartridges work and how these components generate electrical/audio signals from the vibrations.
How do turntable phono cartridges work?
The cartridges work on the electromagnetic law of physics, i.e., Faraday’s law.
Faraday’s law states that an electromotive force (emf) is produced by a change in the magnetic flux through a coil nearby.
Well, I know understanding the law in technical language is quite difficult, so I have explained the law and everything about the cartridge’s working principle in the easiest way possible.
Let’s figure out the working principle of cartridges.
Firstly, let’s talk about the record grooves. We all know that record grooves are V-shaped, where one side is the left channel, and the other is the right channel.
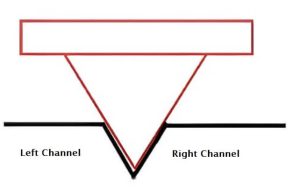
The right channel is towards the record’s edge, and the left channel towards the record’s inner section.
Both these channels have audio signals.
![]()
When the stylus runs inside record grooves, it vibrates and fetches the audio signals. The vibrations are transmitted into the cartridge through the medium of the cantilever.
As I told you before, a cantilever hosts two elements: a stylus at one end and a magnet/coil/iron/ceramic element at the other.
The element at the other end depends on the cartridge’s electric signal generation system, or we can say the type of cartridge.
Let’s take a moving magnet (MM) cartridge as an example.
The cantilever’s other end hosts tiny permanent magnets, which are placed near wired coils.
So whenever the tiny permanent magnets move near the wired coils, there is a change in magnetic flux, and electromotive force (emf) is produced. This electromotive force (emf) is an energy transfer to an electric circuit per unit of electric charge, measured in volts.
Confused? Let me make it easier with the help of an example.
Suppose the cartridge is a small empty box where the cantilever (attached to one side) hangs between the center of the box. The side of the box has wired coils.
When the cantilever vibrates, the tiny permanent magnets at the end of the cantilever vibrate too. The wired coils attached to the side of the cartridge’s body catch these vibrations and convert them into electric signals.
Due to its working principle, i.e., conversion of vibrations into electric current, the turntable pickup is also known as an electromechanical transducer.
Also, note that only the cantilever moves inside the cartridge, which means the wired coils attached inside the cartridge’s body remain stationary.
To understand how this small electric current is converted into music, I recommend you check out this article: How do vinyl records work?. We have converted everything, i.e., the recording process, the mastering process, the stamping process, the pressing process, and the playback process.
Well, this is all about the cartridge’s working principle. Now, let’s discuss the different types of cartridges.
Types of turntable cartridges:
There are five popular types of cartridges in the market:
- Moving magnet cartridges
- Moving coil cartridges
- Moving iron cartridges
- Moving micro cross cartridges
- Ceramic cartridges
Here, we are going to talk about the different mechanisms of each cartridge. You will also find a diagram with the marking of every part of the cartridge.
Moving magnet cartridges (MMC):
In moving magnet cartridges, there are stationary wired coils inside the body, and tiny permanent magnets are placed at the end of the cantilever.
So, when the stylus runs inside record grooves, it vibrates, and so do the tiny permanent magnets attached to the cantilever near the stationary wired coils, which induce a small current.
Diagram:
You can understand the different parts and engineering of moving magnet cartridges from the diagram shared below: [Source]
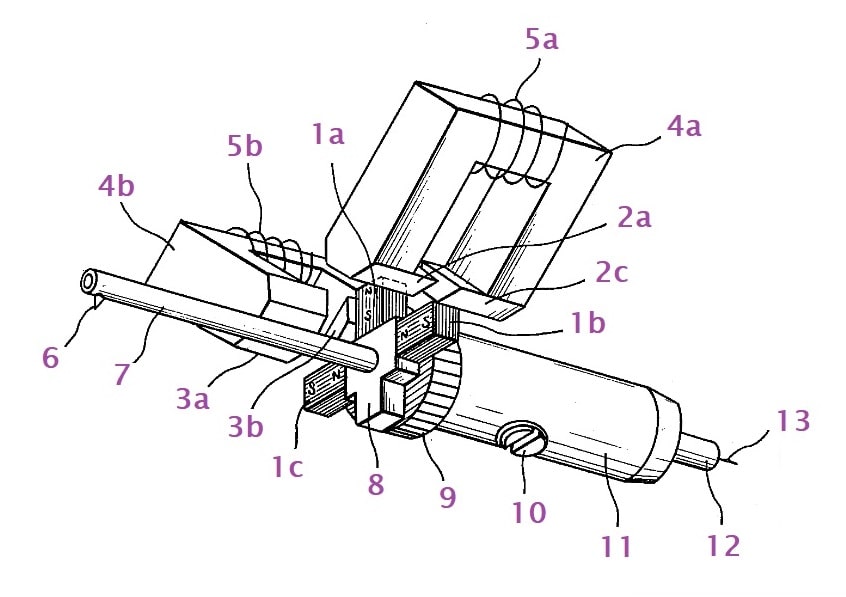
Magnets:
1a, 1b, and 1c markings are the movable magnets attached to the end of the cantilever.
Poles:
2a, 2c, and 3a, 3b markings are the poles that are engaged between movable magnets and the vibration system.
Yoke:
4a is a yoke for the right-hand channel, and 4b is for the left-hand channel. These yokes are made from ferrite material, high magnetic-permeability material such as bent and worked permalloy or the like.
Wired coils:
5a is the coil for the right channel, and 5b is the coil for the left channel.
Stylus:
The “6” marking refers to the stylus.
Cantilever:
The “7” marking refers to the cantilever.
Moving magnet holder:
The “8” marking refers to the moving magnet holder.
Damper:
The “9” marking refers to the damper.
Mounting Screw:
The “10” marking refers to the mounting screw.
Cylindrical Support Body:
The “11” marking refers to the cylindrical support body.
Support Pipe:
The “12” marking refers to the support pipe.
Suspension Wire:
The “13” marking refers to the suspension wire.
Moving Coil Cartridges (MCC):
In moving coil cartridges, there are stationary permanent magnets inside the cartridge body, and coils are wired at the end of the cantilever.
So, when the stylus runs inside record grooves, it vibrates, and so do the wired coils attached to the cantilever near the stationary permanent magnets, which induce a small current.
Diagram:
You can understand the different parts and engineering of moving coil cartridges from the diagram shared below: [Source]
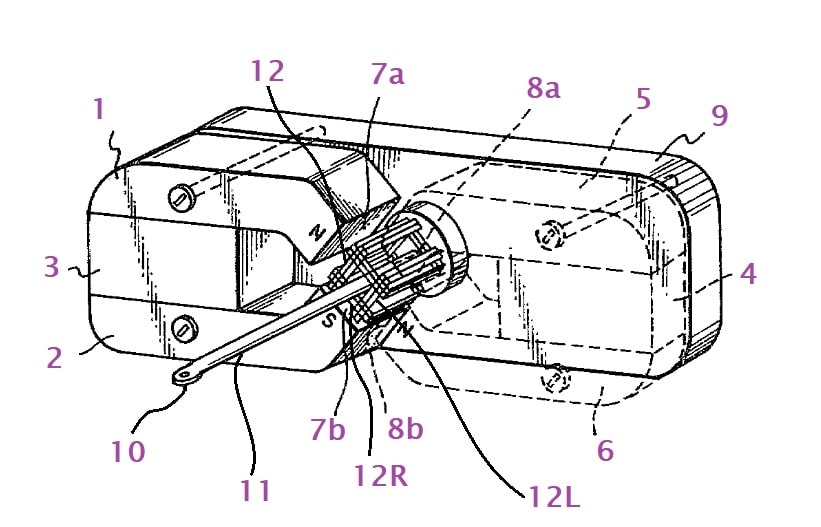
Yokes:
1,2, 5, and 6 are the yokes that are bar-shaped but bent at one end.
The markings of 7a and 7b represent the end of point 1,2 yokes that are disposed to mutually define an angle of 90°. The 7a is magnetized to be N-pole, and 7b is magnetized to be S-pole.
Similarly, the markings of 8a and 8b represent the end of point 5,6 yokes that are disposed to mutually define an angle of 90°. The 8a is magnetized to be S-pole, and 8b is magnetized to be N-pole.
Permanent Magnets:
The markings of 3 and 4 refer to the permanent magnets, which are stationary inside the body.
Non-magnetic material:
The “9” marking refers to the non-magnetic material.
Stylus:
The “10” marking refers to the stylus.
Cantilever:
The “11” marking refers to the cantilever.
Wired Coils:
The “12” marking refers to the wired coils, where “12L” represents left channel reproduction and “12R” represents right channel reproduction.
Well, moving coils and moving magnet cartridges are the popular ones and are often used in turntable setups.
Many people usually get confused between these two and often ask which produces better sound quality. If you have similar thoughts, I recommend you read this article to learn the difference between moving magnet and moving coil cartridges.
Moving Iron Cartridges (MIC):
The moving iron cartridge is considered a moving magnet cartridge by many people in the vinyl community, but MIC’s engineering and working principles are very different from MM cartridges.
In moving iron cartridges, there are stationary permanent magnets and wired coils inside the body, and a small piece of iron is attached at the end of the cantilever.
Well, the working principle is similar to MMC and MCC, i.e., the iron vibrates between wired coils and permanent magnets, which induces a tiny current, but the engineering of the cartridge is very different.
There are two permanent magnets attached to the mounting base, where both magnets have four arms, also known as yokes, and coils are wired on these arms.
So, the iron at the cantilever’s end vibrates between these four arms and induces a small current in the cartridge.
Diagram:
You can understand the different parts and engineering of moving coil cartridges from the diagram shared below: [Source]
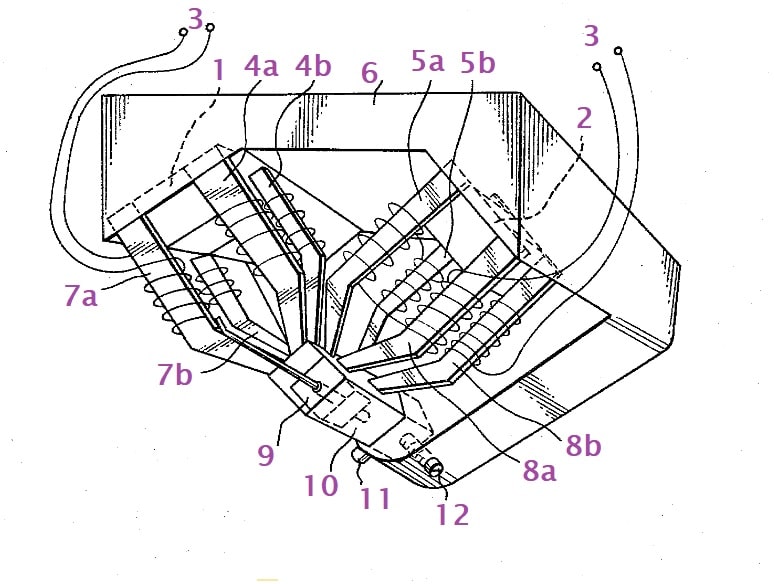
Permanent magnets:
The “1” and “2” markings refer to the permanent magnets.
Wired coils:
The “3” marking refers to the coils wired around the yokes that are connected to permanent magnets.
Yokes:
The “4a”, “4b”, “7a”, and “7b” markings refer to yokes attached to left side permanent magnets and “5a”, “5b”, “8a”, and “8b” markings refer to yokes attached to the right side permanent magnets.
Mounting base:
The “6” marking refers to the mounting base.
Damper:
The “9” marking refers to the damper.
Damper case:
The “10” marking refers to the damper Case.
Screws:
The “11” and “12” markings refers to the screws.
Moving Micro Cross Cartridges (MMCC):
The moving micro cross cartridge was invented by Bang & Olufsen, which has a slight variation in the design and engineering if compared with moving iron cartridges.
Just like MIC, in MMCC, there are two permanent magnets attached to the mounting base, and both magnets have four yokes, and the coils are wired on these yokes.
But instead of iron, a micro cross is attached at the end of the cantilever, which vibrates when the stylus vibrates and induces a small current in the cartridge.
Ceramic Cartridges:
In ceramic cartridges, a tiny electric current is created using the piezoelectric effect. Unlike MMC, MCC, MIC, and MMCC, understanding the engineering of ceramic cartridges is very easy and these cartridges are mostly used in suitcase record players like Crosley and Victrola.
In ceramic cartridges, “Coupling yoke” and “Ceramic Element or Piezoelectric Crystals” are responsible for generating current using the piezoelectric effect.
In simple words, the electricity generated from mechanical stress, pressure, and latent heat is called the piezoelectric effect. You can learn more about the piezoelectric effect here.
In ceramic cartridges, the stylus generates vibrations while running on record grooves, and the coupling yoke, which comes in contact with the cantilever, transfers these vibrations to the ceramic element or piezoelectric crystals, which flex them, and a small current is produced.
So, this is how ceramic cartridges work. Now, let’s understand the parts of ceramic cartridges.
Diagram:
You can understand the engineering of ceramic cartridges with the help of the diagram shared below:
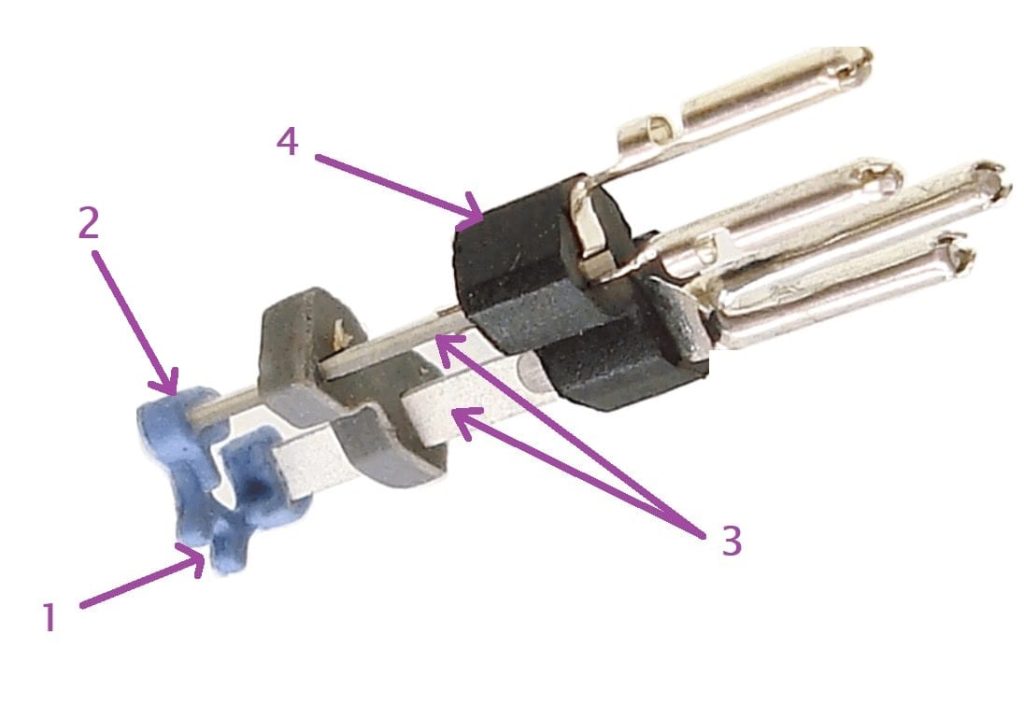
Cantilever’s place:
The “1” marking refers to the cantilever’s place.
Coupling yoke:
The “2” marking refers to the coupling yoke.
Ceramic elements or piezoelectric crystals:
The “3” marking represents the ceramic elements or piezoelectric crystals.
Mounting block:
The “4” marking refers to the mounting block.
Frequently Asked Questions:
Q1- Can any cartridge work for any turntable?
Well, there are different types of mounts that we have discussed above. Your new cartridge should be compatible with the headshell. If the mount type of the old and new cartridge is similar, then you can attach it otherwise, you can’t.
But, still, there are a lot of other factors that you must consider while replacing the cartridges, like tonearm shape, vertical tracking angle adjustment (VTA), phono preamp gains, and much more.
So, I recommend that you always find a cartridge that is suitable for your turntable. You can ask the manufacturer or find a similar cartridge online in case you need to replace the old one.
Q2- How long does a cartridge last on a turntable?
The cartridge can last a lifetime, but a stylus can’t. The average lifespan of a diamond stylus is around 1500-2000 hours, and after that, you must replace it to avoid any further damage.
Q3- Should I replace the stylus or cartridge?
It depends on the type of cartridge you are using. If you are using a cartridge that supports stylus replacement, then you can replace your stylus and keep using the same cartridge, but if your cartridge doesn’t support stylus replacement, like most of the MC cartridges then no matter, how good condition is your cartridge in, you need to replace the whole cartridge.
Q4- Is the cartridge more important than the turntable?
Both the cartridge and the turntable go hand in hand. So, a high-end cartridge won’t do justice to sound on an entry-level turntable, just as an entry-level cartridge on a high-end turntable.
Many factors play a crucial role in sound quality, like the tonearm must be balanced, tracking force and anti-skating must be adjusted, the cartridge must be aligned, and the grounding of the turntable must be perfect, phono preamp gains, powered amplifier or stereo receiver, speakers, static, etc.
Q5- Can a turntable cartridge be repaired?
Yes, a cartridge can be repaired. From re-tipping the stylus to defects inside the cartridge body, everything can be fixed.
Q6- What does a bad turntable cartridge sound like?
You will hear distorted, scratchy, and muddy sounds from the speakers. You will also feel a lack of definition and sound clarity.
Q7- Do more expensive turntables sound better?
Yes, the answer is very obvious. In these high-end and expensive turntables, you will get every component that helps in achieving perfect sound quality, i.e., a good-quality cartridge, a better tonearm, a metal or acrylic platter, vibration-isolated feet, a good-quality motor, a fully customizable motor, and much more.
Well, we have explained what a cartridge is, how it works, and the types of cartridges in simple words that even a beginner can understand without any problem. If you still have queries then please comment below.