 James Williamson
 A phono cartridge is the only part of a record player that comes in contact with the record and fetches audio signals.
And how efficiently a cartridge fetches audio signals depends on three different factors: balanced tonearm, tracking force with anti-skate, and cartridge alignment.
A perfect configuration of these factors unleashes the true potential of the phono cartridge, and you achieve the sound quality from your setup that vinyl is loved for.
Along with sound quality, these adjustments also minimize the wear/tear of the stylus and record grooves.
Previously, we have discussed how to balance a tonearm and how to set tracking force and antiskate. Today, we will discuss how to align the turntable cartridge. We will also discuss cartridge alignment protractors and technical terms, which will help you in your vinyl journey.
While I was writing this guide, I discussed the topic with my friends (who entered the vinyl world a few weeks back) to know their POV on it, and they asked two simple questions: “Is cartridge alignment necessary?” and “What happens if I don’t align it?”.
From my perspective, these are simple questions, but from theirs, these aren’t.
So, let’s start by answering these questions first.
Is cartridge alignment necessary? What happens if we don’t align it?
Yes, cartridge alignment is super important.
A vinyl record is an analog playback medium in which audio signals are retrieved from physical sound waves engraved on the grooves by the stylus.
And, how closely your setup reproduces the original audio from the record depends on the movement and position of the stylus inside the record groove.
The record grooves are V-shaped, and when the stylus runs inside them, it fetches audio information from the left channel and the right channel.
The perfect cartridge alignment means the stylus should remain in the groove’s center while running. If it’s misaligned, it might drag along with one channel, either the left channel or the right channel, throughout the playback session, which results in sound distortion.
Along with sound quality taking a hit, the misalignment will also cause irreparable damage to the stylus and record grooves.
To configure your setup to output the perfect reproduction of the original sound stored in record grooves, increase the lifespan of the stylus and record, and remove sound distortion, you should pay closer attention to cartridge alignment.
There is one more question that many people ask.
When you shouldn’t worry about alignment?
If your turntable doesn’t have a counterweight dial at the end of the tonearm, you don’t need to worry about alignment because the manufacturer has already configured it.
You get a perfectly parallel tonearm, with configuration of tracking force and anti-skate settings, and cartridge alignment. The example of such a turntable is Audio-Technica LP60X.
Now, let’s discuss the technical terms involved in the alignment process that you must know.
Technical terms explanation:
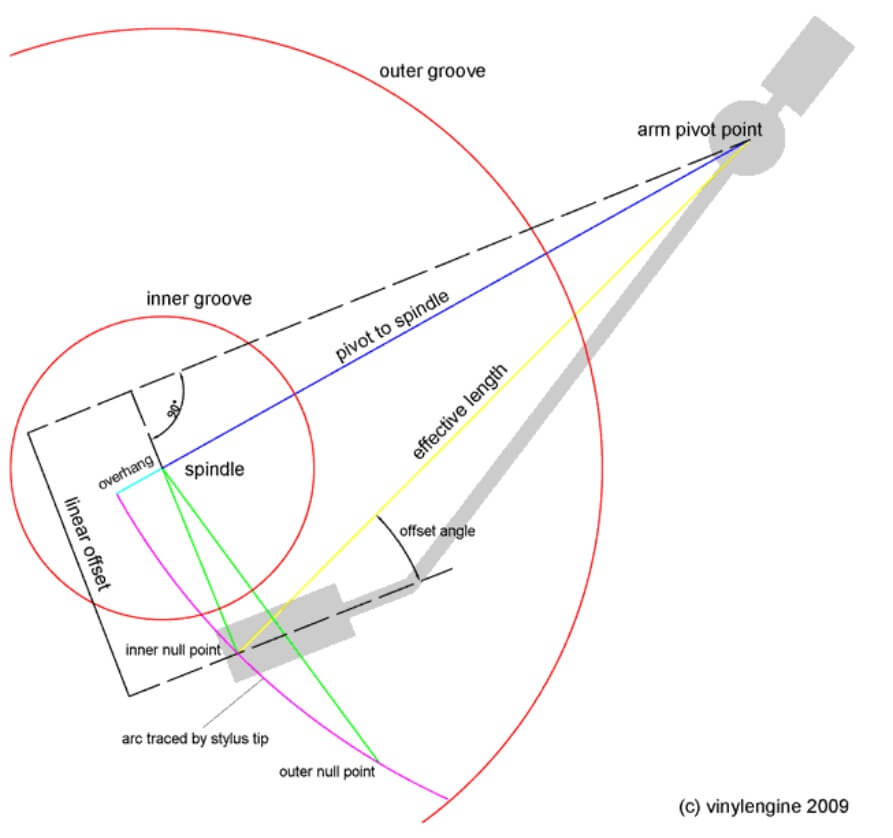
1) Pivot to spindle:
It is the distance between the spindle’s center and the tonearm’s center point.
2) Arm pivot point:
The arm (tonearm) pivot point is the tonearm’s center point.
3) Spindle:
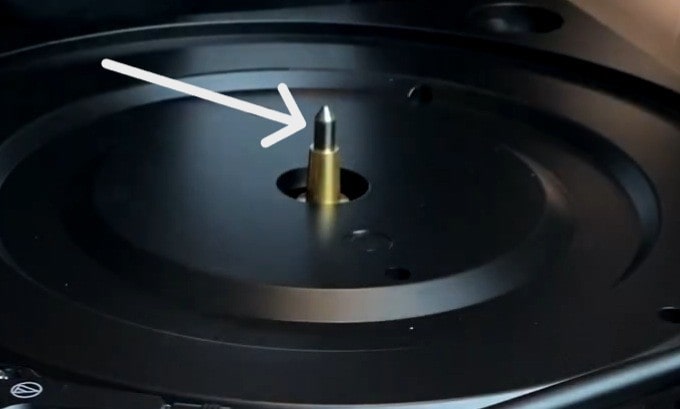
The spindle is the pointed metal tip right in the center of the platter. The role of the spindle is to hold the record in its position while spinning.
In direct drive turntables, it is the end of the motor’s drive shaft. However, in belt drive or idler drive turntables, the spindle has a gear/pulley system underneath, which is connected to the motor.
4) Effective length:
The effective length refers to the distance between the tonearm pivot point and the stylus tip.
5) Null points (inner null point and outer null point):
The null points are the points of tangency. As we know, the tonearm moves in an arc over the record, and to figure out the points at which our tonearm and the record groove’s curve intersect, we use a protractor on which null points are mentioned.
It is pure geometry, and when we align our cartridge according to these null points, the read potential of the cartridge will be unleashed.
6) Offset angle:
The offset angle refers to the angle between the effective length and the cantilever.
7) Arc traced by stylus tip:
The arc shows how the stylus moves over the record.
8) Overhang:
The overhang is the distance between the stylus tip and the spindle when the tonearm is placed or hovered over the spindle. The average overhand will be between 12 and 16mm.
9) Grooves (inner groove and outer groove):
In the image above, the inner groove shows the end of the record grooves, and the outer grooves represent the start of the grooves.
These are the terms you should know before proceeding with the alignment process.
I have explained a concept above, known as null points, which are calculated based on geometry. Not all of us know geometry, and it will be a hassle to calculate null points even if you know geometry.
To make things easier for everyone, we have a tool known as an alignment protractor. Let’s discuss what this alignment protractor is and how to use it.
What is a cartridge alignment protractor?
A cartridge alignment protractor, also known as a turntable protractor, is a tool that helps us align our cartridge perfectly to enhance the sound quality and increase the lifespan of the stylus and record grooves.

This is what a protractor looks like.
You can see a lot of horizontal and vertical lines along with two null points (A and B) and one big black dot (S), which represents the spindle. The mentioned points (A and B) represent the points of tangency.
We place this protractor on our platter and align our cartridge according to these null points and lines to make the geometry of our tonearm perfect.
The protractor shared above is a Baerwald protractor. Besides the Baerwald method, there are two more methods with different null points.
Different types of alignment methods
There are three types of protractors, also known as methods or techniques.
Baerwald
The null points are 66.0 and 120.9 mm.
Loefgren
The null points are 70.3 and 116.6 mm.
Stevenson
The null points are 60.325 and 117.42 mm.
Despite having different null points, the end goal is the same. Let’s discuss which alignment method you should use.
Which turntable alignment method should you use
This question is long-unanswered.
To know the widely used or preferred method, I read multiple threads and articles, and in the end, I can say that there is no preferred method.
It depends on tonearm characteristics and personal choice. I had tried all three methods on my turntable, and my preference is the Stevenson protractor.
You need to try all three and stick to one that suits you.
If you’re still unsure which one to use, I recommend contacting your turntable’s customer support and asking them for their opinion on the alignment method for your turntable model.
Some turntable manufacturers, such as Rega, supply a Stevenson protractor as an accessory. The Fluance turntables supply the Lofegren alignment method.
How to download free alignment protractors?
Your manufacturer hasn’t supplied one? Don’t worry. There are methods to download a free protractor.
Method 1: Vinyl Engine
Note: Vinyl Engine has currently disabled new registrations, and you can’t download Protractor unless you have an account.
Vinyl Engine provides a free alignment protractor that you can print at your end. Here is the step-by-step guide to download the free protractor from the Vinyl Engine.
Steps:
- Go to VinyEngine
- Click on the protractor image that you want to download
- Create a new account or log in to your existing account
That’s it. You can download the protractor for free and print it out.
Method 2: Audio Technica (Stevenson)
You can directly download the Stevenson protractor from the Audio-Technica website.
Method 3: Fluance (Baerwald)
You can directly download the Baerwald protractor from the Fluance website.
Let’s dive deeper and discuss the goal that we want to achieve with cartridge alignment:
Turntable’s Cartridge Alignment Goal:
Front View:

The azimuth concept needs to be applied here.
Side View:
This is our goal for cartridge alignment.
Don’t worry about signs and angles, I will explain everything in simple words.
Let’s first discuss the new terms introduced here: vertical tracking angle (VTA), stylus rake angle (SRA), and azimuth.
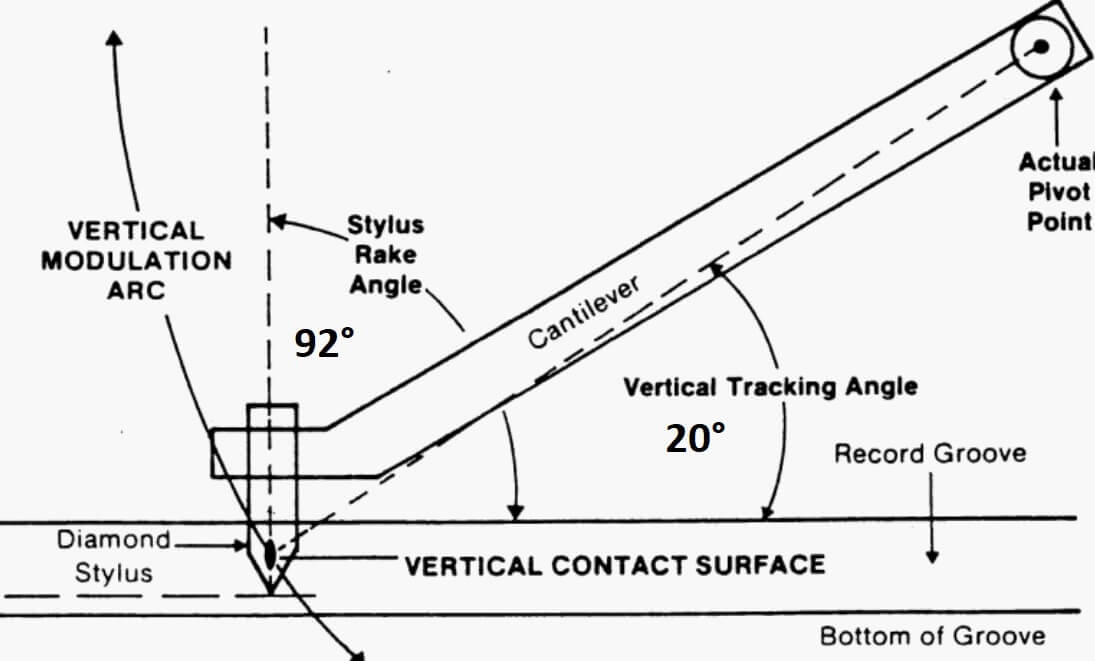
Vertical tracking angle (VTA):
The vertical tracking angle refers to the angle between the cantilever and the record surface. According to my research, the recommended VTA is 20°.
Stylus rake angle (SRA):
The stylus rake angle refers to the angle at which the stylus comes in contact with the record grooves.
In the “front side view” image shared above, it’s mentioned that the angle should be 90°, whereas on the “side view” image, it’s 92°.
Well, there is a strong reason behind the 92° angle adjustment.
During the master disc creation, the stylus that engraves the grooves is positioned at a 92° angle.
To recreate the sound close of a real recording, we need to adjust our stylus to track the grooves efficiently, and the Stylus rake angle helps us in doing so.
Now, you might have questions like Why 92°?
Well, let me answer it.
Why are LPs cut at 92 degrees?
The 92 degrees is a level that is assumed to produce the lowest number on a measurement called intermodulation distortion. In simple words, intermodulation distortion is the creation of unwanted noise when mixing two sounds.
Azimuth:
The azimuth refers to the balance of the stylus when it sits in the record grooves. The stylus should be perfectly balanced in the record groove’s center.
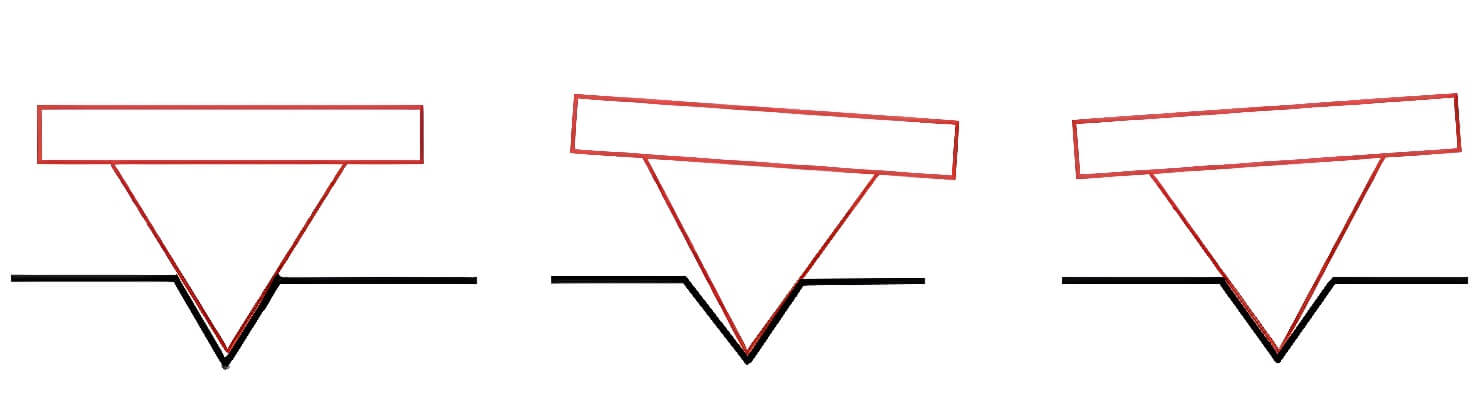
As shown in the image above, the second and third positions are incorrect, whereas the first position of the stylus is perfectly balanced.
We have learnt all the important concepts and terms. Now, let’s proceed with the method to align the cartridge yourself.
How to align a turntable cartridge using a protractor?
Here, we are using Dr. Feickert’s analogue universal protractor and aligning the cartridge using the Baerwald (B) method. You can use any one of your choice.
Step 1:
Turn off the turntable and remove the power cord from the power outlet.
Step 2:
Place the protractor on the platter.
Step 3:
Set the Anti-skating to Zero and free your tonearm from its lock.

Step 4:
Move the tonearm over the platter and unscrew the headshell’s screw slightly. After unscrewing, the cartridge should be movable with slight pressure, not freely.
Step 5:
Most protractors have only two null points, whereas Dr. Feickert’s analogue universal protractor comes with null points of all three alignment methods, along with step markings. In this guide, we will proceed with step markings.
Note: If your protractor doesn’t have step markings, you can start with the null point near the outer groove.
Set the cueing device down and try placing the stylus tip in the middle of the ‘X’ mark on the protractor in step 1. You might need to adjust the cartridge.
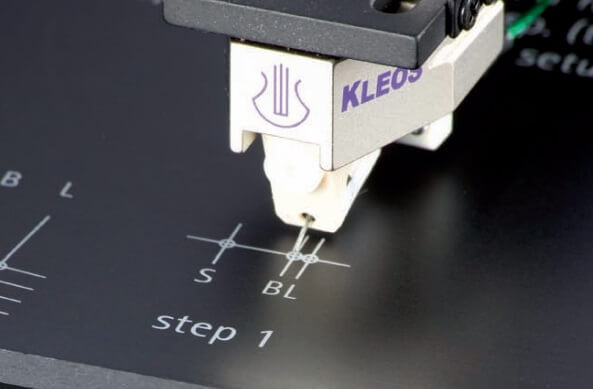
Here, B represents the Baerwald technique, L represents the Lofgren technique, and S represents the Stevenson technique.
As we are using the Baerwald technique, we will try placing the stylus tip in the middle of the ‘X’ mark represented as B.
Step 6:
Once the stylus tip lands directly on the null point, carefully tighten one screw of the headshell. Make sure the cartridge is still adjustable with some pressure.
Step 7:
Pick up the tonearm and move the platter until your stylus reaches step 2 printed on the protractor.
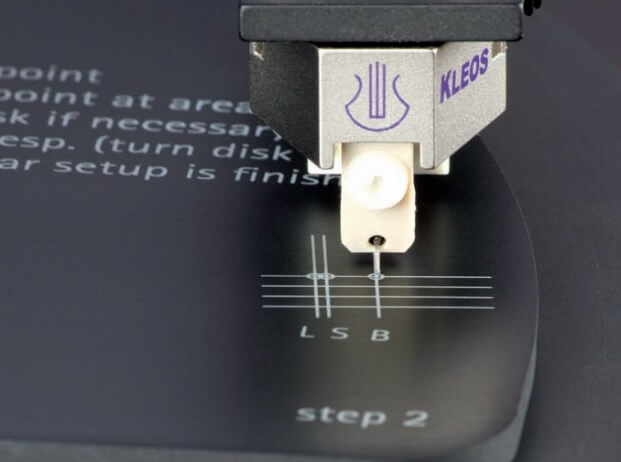
Step 8:
Try placing the stylus tip right on the center of the ‘X’ mark on B in step 2.
If the stylus tip landed right in the center, you are almost done, but if not, then keep adjusting the cartridge until you get the center of the ‘X’ mark on B in step 1 and the ‘X’ mark on B in step 2 by just moving the platter, and a little, tighten the headshell’s screws.
Most protractors have just two null points of one alignment method, but in Dr. Feickert’s universal protractor, there are three null points of one alignment method. If you have successfully aligned the cartridge to the two null points, the third one will be aligned automatically.
Step 9:
Now, we will adjust the Azimuth. Our goal is to achieve a 90° angle when the stylus is placed above the protractor.
Using Dr. Feickert’s analogue universal protractor:
Look from the front and align the cantilever to the vertical line behind the ‘X’ mark.
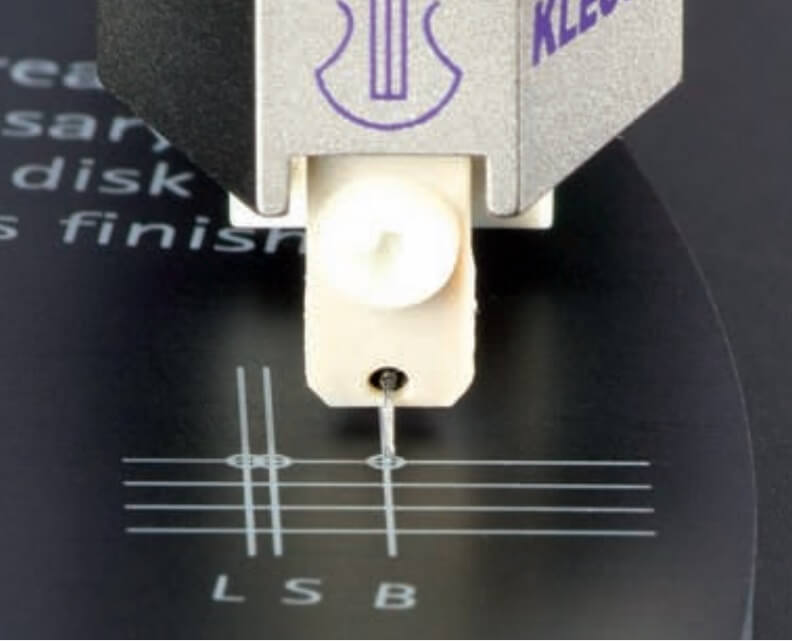
Using Normal Protractor:
You need to parallel align the cartridge body with line 1 and line 2.
Mirror Method:
You can place a small mirror under the stylus tip. This will help you make adjustments easily.
Step 10:
Tighten the screws and re-check alignment again.
That’s it. You have successfully aligned your cartridge.
Frequently Asked Questions:
Q1- Are turntable protractors universal?
For modern turntables, the protractors are universal. For an old record player or turntable with a specific cartridge, use the protractor supplied with the unit.
Q2- What is the angle of a cartridge alignment?
The vertical tracking angle (VTA) should be 20°, the stylus rake angle (SRA) should be 92°, and the azimuth should be 90° to allow the stylus to track the record grooves efficiently.
Q3- What are the two types of protractors?
There are two types of protractors:
- Circular Protractor
- Semicircular Protractor
The circular protractor is a full circle, 360°, that covers the whole platter. The semicircular protractor covers only half of the platter, i.e., 180°.
Q4- When do I need to align my cartridge?
Whenever you set up your turntable or change the cartridge, you need to align it.


I’ve been a vinyl collector since high school still buying albums and 45s also stereo equipment like the old 70s and 80s music is 60s,thru 80s
Oh, same here! I began collecting records in high school and continue to do so.