 James Williamson
 Is your vinyl record warped?
Don’t worry, I’ve got you covered.
Well, I have experienced many heartbreaking situations in my life, but getting my favorite vinyl record warped still tops the list.
One more thing that worsens the situation is that most of the methods available online to fix warped records are ineffective. I have tried almost all the them but they have given me a success rate of around 40-50%.
So, I dug deeper to figure out the reason behind that low success rate and tweaked the methods according to my experience. After my tweaks, the success rate has increased by 25-30%, resulting in an overall success rate of 65-80%.
One method that gave me an almost 90% success rate in unwarping vinyl records is the record clamp. However, before I achieved results with the clamp, I had tried many different methods, which included applying heat and pressure on records, using popular products like Record Pi and vinyl flat, online flattening services, and some old-school methods.
In this article, I have provided in-depth information about each method, including its pros and cons, measures to take while following that method, and also shared the before-and-after pictures (final results) of the records.
But before jumping into methods, let’s first discuss three important questions asked to me repeatedly over emails and messages: “How to tell if a record is warped?”, “Is it possible to fix all warped records?” and “Is it OK to play a slightly warped record?”
Let me address these common questions first.
How to tell if a record is warped?
Determining whether a record is warped or not is relatively easy.
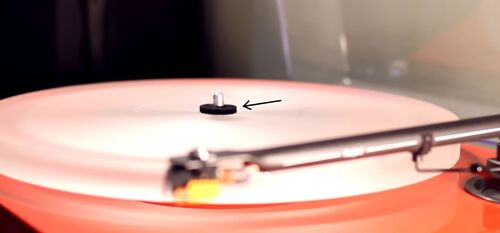
The best way is to put your record on the turntable and hit the start button. Once the record starts spinning, take a closer look at the edges of the record.
If you are seeing waves on the edges, then your record is warped; otherwise, your record is in good condition.
For example, look at this GIF:
In the GIF above, you can see a wave at the edge of the record, indicating that the record is in poor condition and needs to be repaired.
Most beginners ignore these waves, thinking they are a normal wobble, but let me tell you that records are not supposed to wobble, and this type of wobbling can cause record skipping issues, and in the worst case, damage to the stylus.
A slightly warped record is okay to play and mostly considered normal, but if your record’s warp matches the record shown in the GIF above, then it’s not good.
Although it is still playable, it won’t sound good. You will hear distorted sound, and along with that, it will also affect the wow and flutter.
Let’s jump to another important question.
Is it possible to fix all warped records?
The answer is no.
As I mentioned earlier, the success rate in fixing records is not 100%, and these methods won’t work perfectly on records with manufacturing defects.
Let me explain this with the help of an example:
Suppose a record, which was once in good condition or flat, is now warped due to improper storage, then you can fix it.
However, if you receive a brand-new vinyl that is already warped due to manufacturing defects, then the hope of fixing it is very low. If you purchased a brand-new vinyl that was already warped when you received it, then I suggest you get it replaced and save yourself a lot of trouble fixing it.
Let’s start with the main concern.
How to fix a warped vinyl record:
All the methods mentioned below share a common and most important step, i.e., cleaning the record.
There shouldn’t be a single dust particle on your record or inside the grooves, so I recommend you clean records using our best way to clean vinyl records; otherwise, you will regret it later.
As I mentioned earlier, I have tried multiple methods. Although I will be sharing all the methods, but I have categorized them for your ease.
- Recommended methods (High success rate)
- DIY at Home methods (Working, but with a lower success rate)
Recommended Methods
These methods have proven results and a very high success rate.
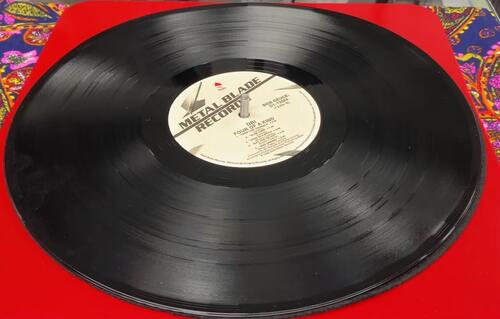
Method 1: Using a record clamp (dish warp record)
Let me first explain what a dish warp record is:
When one side of the record is touching the platter perfectly, but the other side is not, or your record is perfect from the center, but as it reaches the edges, it bends upwards. If your record matches this condition, then it’s called a dish warp record.
For these records, the record clamp has a 100% success rate. You need to buy a record clamp, place it on top of your record, and you’re done fixing your record.
You heard it right, it’s that easy.
A record clamp is often underrated in the vinyl community, and many people are unaware of its existence and how to use it.
Most people confuse a record clamp with a record weight, but both are different.
A record weight looks like a clamp, but it simply puts weight on the record, which forces the record to stick on the platter. You can put it directly over the spindle, and that’s it.
Although the concept of record weight is similar to a record clamp, a record clamp works differently.
A record clamp comes with a felt washer or a nozzle tip, along with a clamp with a tightening knob. I have seen very few people talking about it online, and Dan from VinylFury, I think, is one of the first people to discuss it in this YouTube video.
How to use a record clamp:
Step 1:
Remove the record from the platter and place a felt washer or a nozzle tip on the spindle.
Step 2:
Place the record on the platter, i.e, on top of a felt washer or a nozzle tip. Now, you will see the space between the platter and your record.
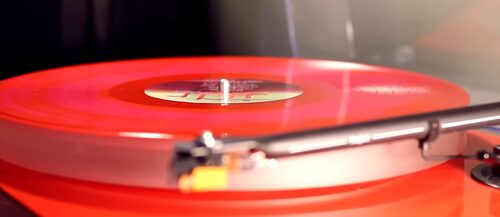
Step 3:
Place the clamp on the spindle and apply gentle pressure using your fingers until the record sits perfectly on the platter and then, tighten the knob.
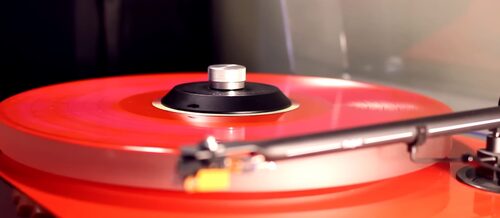
That’s it. After tightening the knob, you will see the record sits perfectly fine on the platter.
Results:
Before:
After:
Well, some people think that this method will put extra weight on the turntable and its motor, which might damage it. However, trust me, the record clamps are very lightweight. When you are tighten the knob, the record is tightened between the felt washer and nozzle tip, not the clamp.
The pressure you are applying to the record before tightening the clamp is very low, so the record clamp won’t cause any damage to your turntable or your records.
Method 2: Vinyl or disc flattener service
The vinyl record flattener service, also known as disc flattener service, is one of the safest methods you can choose to get your vinyl fixed.
Nowadays, I don’t get my records warped, thanks to the storage techniques I follow. However, when I was a beginner, I didn’t know any record storage techniques, so most of my records warped over time.
Just as you are currently doing research, I also did the same, but didn’t find any safe solutions to fix them.
So, after discussing it with my friends, I chose vinyl flattener services, and guess what? I was quite impressed with their work, and they just fixed my records and delivered them to me within 1 day.
I paid around $6 for each record, which I think is quite a good price for a $30-$100 LP. I feel this is a lot better than trying multiple DIY methods and seeing your record get ruined right before your eyes.
To use record flattener services, simply visit a nearby record player shop and ask if they offer this service.
If yes, then you are good to go; otherwise, you can ask them about providers, and they will guide you much better.
My Suggestion: Always try to get 1 cheaper record fixed by them and check the results. If you are satisfied, then you can keep using their services; otherwise, you can always find someone else.
My thought here is – “Not everyone is professional”.
This method has some cons, too. If you have a large collection of warped records, then it becomes an expensive method.
Method 3: Record Pi or vinyl flat tools
Record Pi and vinyl flat tools are record flattening tools that allow you to unwarp your badly warped record very easily.
The working principle of both tools is similar to proven methods, i.e., heat and pressure.
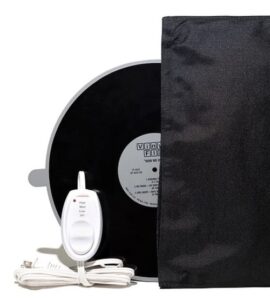
Record Pi:

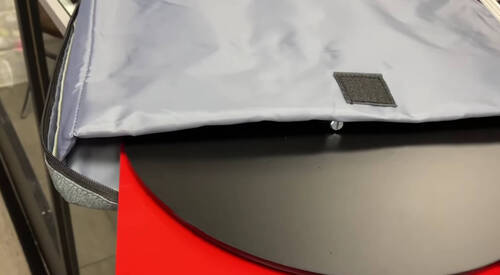
With this toolkit, you will receive a thermal bag, two metal plates, i.e., a record protector or groove guard (a large square metal piece for the bottom and a rounded one for the top), and temperature control units. You will also receive a felt mat larger than a 12-inch record, with enough space for a spindle, which accommodates all kinds of record sizes. However, Record PI also offers separate felt mats for 12-inch and 7-inch records. You will also receive an instruction manual along with the kit that I recommend you read before making any moves.
Vinyl Flat:
With this toolkit, you will receive a groovy pouch (thermal pouch) with a temperature control knob, two round cast iron plates (one for the bottom and one for the top), two felt mats, and a digital thermometer.
So, how do these tools work?
How to use record flattener tools like record PI or vinyl flat:
Well, both tools work the same, and let me explain the how-to process using the record Pi.
Step 1:
Place the bottom groove guard on the table, and then place the basic all-size felt mat on top of it.
Step 2:
Place your warped record on the felt mat
Step 3:
Place the round piece of metal or the top groove guard over the record
Step 4:
Tighten the metal pieces with the cylindrical wing nut gently. There is no need to apply force because the weight of the top groove guard is sufficient to add enough pressure for the process to work.
Step 5:
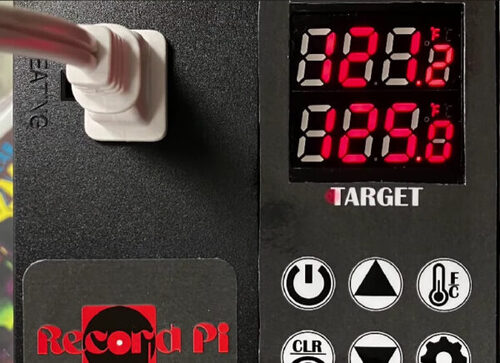
Now, place the unit inside the bag and turn on the heat with temperature control. The record Pi suggests starting with 125°F with a minimum of 2 hours of bake time, in which the unit itself takes around 30-40 minutes to reach the specified temperature.
Our Recommendation:
- 180-gram vinyl- 135°F is a good starting temperature.
- Normal records- 125°F is a good starting temperature.
Caution: Do not exceed the recommended temperatures. If you are not seeing the results, I recommend trying the same process 3-4 times. Some records even take more repetition depending on their condition.
Step 6:
After the baking time is over, you need to let the record sit inside the groove protector for around 45 minutes to 1 hour to cool down naturally. That’s it.
Results:
The record Pi and Vinyl Flat give very good results, and I have seen many people achieve success with these tools. If you have a large collection, you can buy this tool for sure.
Method 4: Orb disc flattener
If you have heard that there is a specific tool to fix the warped vinyl record, then the Orb disc flattener is one everyone is talking about.
This device is costly, and the listing price varies between $1,000 to $2,000.
If you are looking to offer vinyl-flattering services in your area, this device is a must, and you will get a return on investment (ROI) in no time.
However, if you are a record collector, I don’t recommend buying it; instead, you can use record-flattening services in your area or try the methods mentioned above.
Now, we will share proven methods that you can follow using your home equipment.
DIY At Home:
We are now sharing DIY methods that are yielding good results, and people are discussing these methods all over the internet.
Method 1: Flatten records without heat (Using books)
Without proper heat control, your records can melt in no time, and many people have already had their records damaged or destroyed while trying different methods.
So people started looking for a method that doesn’t require any heat, but in their subconscious minds, they have one question.
Can you flatten a warped record with books?
The answer is yes, you can flatten your records with books, since no heat is involved, you have to be very patient, as this is a non-promising and longer-duration method.
Here is a step-by-step guide:
1) Take two books that are larger than your vinyl record size.
2) Place one book at the bottom and then place your record over it (Imp: Make sure the book covers your record properly, and your record must be inside its sleeves).
3) Now, place the second book on top of your record. Place some weight on the books, but ensure the weight is equally distributed on all four corners of the books, and store them in a proper place.
That’s it. Now, you need to wait.
Results:
This method may take a minimum of 8 weeks or even months, depending on the condition of your record. I was not satisfied with the final results, but I have seen people sharing success stories on forums.
Method 2: T-shirts heating press (unique method):
This is the most unique method I found while researching, and the results of this method amazed me.
I know not all of us have a heating press at home, but since I found this method working flawlessly, I decided to share this with you guys.
Here are the requirements for this method to work:
- 2 Parchment Papers (Size must be bigger than your record)
- T-shirt heating press
- Patience
Now, let’s proceed further.
Step 1:
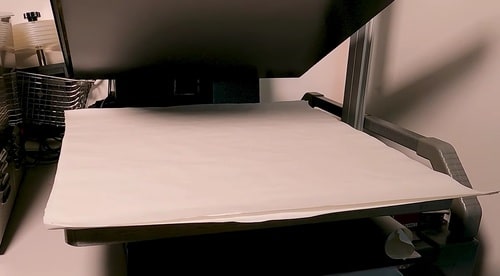
Place one piece of parchment paper at the base of the heating press, then put the record on top of it. After that, place the second parchment paper on top of the record again. Ensures the parchment paper is covering the record from top to bottom properly.
Step 2:
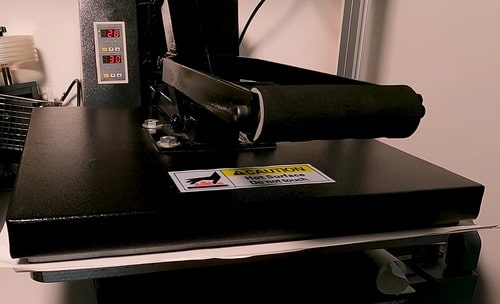
Close the press
Step 3:
Set the temperature to 60°C and let your record rest at this temperature.
Step 4:
When the heating press reaches 60°C, turn off the press and leave your record inside until it cools down naturally.
Step 5:
Once your record has cooled, take it out of the press, place it on the turntable, and spin it. You will see some improvement. You can repeat the steps multiple times to get the desired results.
Results:
Before:
After:
Method 3: Oven with glass panes (2 ways)
There are two ways to use glass panes, but I recommend trying only the first one.
Note: If you can’t set the temperature to 60°C in your oven, please do yourself and your records a favor, don’t try it. You will get your record melted in no time.
Here are the requirements:
- 2 glass panes (size must be bigger than your record)
- 2 cardboard cutouts of the same size (size must be bigger than your record)
- Record paper sleeve
- Infrared thermometer
- Oven
Now, let’s check both methods one by one:
Using the Oven But Smartly (Recommended)
Step 1:
Clean the glass panes using any cleaning solution
Step 2:
Place your glass panes inside the oven and turn on the heat. Keep checking the temperature of the glass panes in between. The idea is to make the glass pane’s temperature rise to around 60°C.
Step 3:
Once the glass panes have reached a temperature of 60°C, put the glass pane sheet on the table. Make sure you are wearing your kitchen gloves; otherwise, you need to fix your burnt hands first. Haha, Just Kidding!
Step 4:
Now, place one cardboard cutout in the center of the hot glass pane, and then put your record on top of the glass pane. (The record must be inside the record sleeves.)
Step 5:
Place the other cardboard cutout on top of the record, and then place the second hot glass pane on top of the cardboard, making a sandwich.
Step 6:
Leave it until the glass pane’s temperature matches the room temperature.
Step 7:
Now, check whether your record is fixed or not. Most probably, you will see improvements. You can repeat the method multiple times to get the desired results.
Pro tip: For quick results, remove the cardboard cutouts from the sandwich and directly place the record inside the record sleeves on the heated glass panes.
Results:
Directly in the oven (Strictly Not Recommended)
Although this method is not recommended, I am still sharing it because I have seen people getting results from it. But, there are more disaster stories than success stories with this method.
Here are the steps:
Step 1:
Put one glass pane on the table and place the record (inside the record sleeve) on it. After that, place the second glass pane over the record. In simple terms, create a sandwich of glass panes with your vinyl record.
Step 2:
Turn on the oven and set the heat to 60°C
Step 3:
Place the glass pane sandwich inside the oven and let it stay there for approximately 60 minutes. Keep checking the record status in between.
Step 4:
After 60 minutes, remove the glass panes from the oven, place them on the table, and let them cool to normal room temperature.
Step 5:
Monitor the improvement and repeat the steps until you are satisfied.
Results:
Before:
After:
While both methods involve working with oven heat, the first method takes a different approach and is the safest and best method to follow when working with the oven.
The first method also has a better success ratio, as I have seen many people achieve results. However, regarding the second method, I strictly don’t recommend trying it. You’ll get your record grooves melting before you even realize it.
Method 4: Hair dryer with glass panes
I tried this method on my cheapest record because the risk involved is real.
While researching, I noticed a pattern in stories shared by people. They are either blowing hot air directly on the record and then placing some weight pressure on top of it, or they are adding too much weight. Both of these methods are pretty bad for your record.
Then, I found a method in which the record is placed between two glass panes, and then hot air is blown upon the glass panes. It looked less risky, so I tried it and got great results.
And finally, I got the answer to the most common question people ask me on this topic.
Can you fix a warped record with a hair dryer?
Yes, you can fix your record using a hair dryer, but with precautions. You can put your record inside its sleeves and then make a record sandwich with glass panes. Once done, you can blow the hot air on the glass planes for 20-30 seconds while maintaining a good distance and moving the hair dryer to prevent a heat spot.
I have already shared
Let’s talk about this in detail.
Requirements: You need two glass panes (size must be larger than your record), paper sleeves, and a hair dryer.
Here is the step-by-step guide:
Step 1:
Put one glass pane on the table and place the record (inside the record sleeve) on it. After that, place the second glass pane over the record. In simple terms, make a sandwich of glass panes with your vinyl record.
Step 2:
Use your hair dryer directly on the glass panes. (Maintain a good distance between the hair dryer and glass panes, and also keep moving the hair dryer to avoid heat spots.)
Step 3:
Use a hair dryer until the heat reaches the record, and put some weight on the glass panes. (The weight must be equally distributed.)
Step 4:
Leave it until the record’s temperature reaches room temperature.
That’s it. Now, check for improvements and keep repeating the process until you are satisfied.
Here is the video tutorial for this method:
Method 5: Sun & Car Method
It’s the most common method, and most probably, every single person with a warped record has tried it.
It has done wonders for many, so I recommend you try this one as well. (The risk involved is less.)
Requirements: You need two glass panes (size must be larger than your record), paper sleeves, and a hot sunny day outside.
Here is the step-by-step guide:
Step 1:
Put one glass pane on the table and place the record (inside the record sleeve) on it. After that, place the second glass pane over the record. In simple terms, make a sandwich of glass panes with your vinyl record.
Step 2:
Tighten the clamps on the glass panes, which will keep the record in its place.
Step 3:
Place the panes in your car on a hot sunny day and let them rest there until sunset. That’s it.
You might need to repeat the steps multiple times to get the desired results.
That’s it.
These are the proven methods that have amazing results.
Well, you got your records fixed, and now it’s time to learn how to prevent records from warping in the future.
How to prevent records from warping?
These are simple yet effective storage methods that you should follow:
Storing records vertically
Never stack your records on each other.
You should store records in an upright position, and the angle of storage must be 90° to avoid uneven pressure on them.
Some people store in bookshelves, cabinets, but I store them in carts. You can choose the place accordingly.
Away from heat sources
Heat is the major reason behind warping.
You must ensure that heat sources, like sunlight, fireplaces, and gadgets that emit heat, etc., are not placed near your storage.
Outer and inner sleeves
Your record must be sitting inside its cover. For inner covers, you can use anti-static sleeves.
Cold and humidity-free
The room where you store your records should be cool and humidity-free.
That’s it. I have been following these storage methods, and not even a single record has warped in the last few years of my vinyl journey.
Frequently Asked Questions:
Q1: Is it OK to play a warped record?
A slightly warped record is playable and mostly considered normal, but I wouldn’t recommend playing a bad one.
The reason is that the warp prevents the stylus from running smoothly inside record grooves, and it can even cause the stylus to jump over the records, which will eventually lead to skipping and sound distortion. Additionally, your stylus will get damaged.
Q2: Does storing records flat damage them?
Yes, stacking records on top of each other puts pressure on the records at the bottom, which causes damage.
Q4: Are warped records ruined?
No, warped records are not ruined. You can always use methods to fix warped records.
Q5: Do warped records sound bad?
A major warp on the vinyl will sound bad.
Q6: Can a warped record damage the stylus?
Yes, a warped record can cause the stylus to jump, causing damage.
Q7- What is my preferred method to fix records?
Record clamp is my preferred method and it has worked for me almost every single time.
I have shared almost all the working methods to fix a warped record on your own. Do try these methods and let me know the results in the comments below. If you have success with a different method, do share it with us. We will add this method here, which will be very helpful for the whole vinyl community.


Nobody discussed “Out of Round” records, where the record seems flat but the needle moves left and right causing a shushing sound at the beginning of the record. Can this be fixed?
If the issue is due to a manufacturing defect, you can’t do anything.